Introduction
The AllStar client software includes a rich set of configuration options which are generally exposed in the various “conf” files. Since ClearNode is intended as a compact personal node, we try to bring the most relevant options up to the mobile applications. As time goes by we try to satisfy end user requests for more options, so you will see this list of Node Setup items expand.
Node Setup Screens
There are several Setup screens that you can navigate to by tapping on the relevant row. On this page we will document three of these options: AllStar Setup, EchoLink Setup and Operating System Setup – these being the primary setup tasks for “getting on the air”. The other settings are documented at the following linked pages: Digital Bridge Setup, USB Audio Setup, Timed Events Setup, WiFi Networks Setup, Notifications Setup, Announcements Setup.
Where is the node setup stored ?
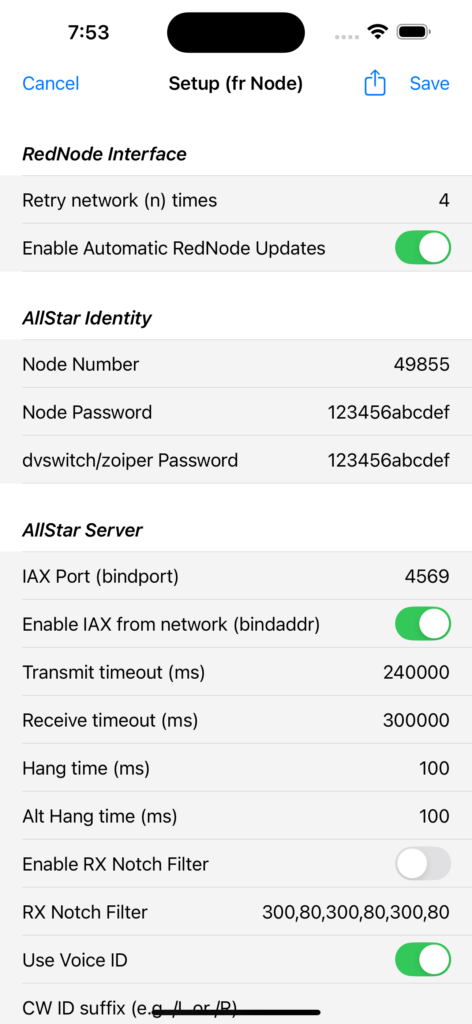
Your node setup is generally stored on the node – so in order to edit the setup it must first be retrieved from the node – this happens when you enter any of the Node Setup screens. However, a copy of the setup is also kept in the ClearNode mobile app – and that is what is first displayed when you enter the Setup screen – until the setup is retrieved from the node. Pay attention to the title of the screen – initially it will say “Setup (fr App)” – once the app has received the setup from the node it will change to “Setup (fr Node)”. Typically you want to wait until the setup has been retrieved from the node before proceeding. If it doesn’t change to “(fr Node)”, there is a problem with communications between the mobile app and the ClearNode device.
AllStar Setup
Tap on the first of the Setup options – AllStar Setup. To configure a basic AllStar node, only 2 items need to be configured – in the AllStar Identity section – Node Number and Node Password. If this is your first and only AllStar node – configure these 2 items and leave everything else at the defaults, especially if you’re not sure what the other settings do.
After editing a setup value in the setup screen you must send it to the node to update it’s configuration – you do so by tapping the Save icon in the top right corner of the screen. Your node will reboot. If it doesn’t reboot, you have not successfully updated the node.
There are 9 Setup Sections:
- RedNode Interface
- AllStar Identity
- AllStar Server
- Supermon/Allmon
- Telemetry
- Weather Options
- SkywarnPlus Options
- Streaming Audio Setup
- HamVoIP Identity
RedNode Interface Section
Retry network (n) times: During boot and node startup ClearNode attempts to reach its servers on the internet. After each try it waits an increasing period of time and will try “n” times before giving up and activating the WiFiByLight functionality (solid Red LED). Generally 4 is the optimal number of times to try – you may increase this number if you know your WiFi devices “struggle” to get connected.
Enable automatic RedNode updates: if this setting is turned on, each time your node starts up (after a reboot or a power up), it will check with our update server and perform an immediate update if a newer version of the RedNode software is available.
AllStar Identity Section
Node Number & Node Password: These are the bare minimum fields that you must fill out for your ClearNode to function. You may leave everything else on the Node Setup screen at the default values for a very simple installation. Node Numbers are assigned by the AllStarLink organization, as are the initial passwords. Note that the Node Password is NOT normally your AllStar Portal Login password – each node number has it’s own unique password which you can discover at the AllStarLink.org web portal.
dvswitch/zoiper Password: ClearNode can be configured to accept connections from the Android app “DVSwitch” or the iOS apps “Zoiper” and “RepeaterPhone”. This is where you would configure the password for those apps to use to connect to your node. See Zoiper & DVSwitch for more details.
AllStar Server Section
IAXPort (bindport): This is the UDP network port that your ClearNode uses to pass encoded voice data between nodes. The default is 4569 and if you only have one node on your network, that’s fine. If you have multiple nodes on your home or office network – each node needs to have a different IAX Port so they can work independently of each other.
If you want to enable incoming connections to your node, you must forward this UDP port number through your WiFi or Ethernet router/firewall/hotspot. For outgoing connections, this is not necessary.
Enable IAX from network (bindaddr): Turn this on to allow network connections to the AllStar Manager from outside of your node. You might want this for other mobile or desktop applications that can control AllStar.
Transmit/Receive timeout (ms): Generally leave these values at the defaults. AllStar will “timeout” a very long QSO, either incoming or outgoing, according to these timings. This is for the good of the larger community to protect the system against “lockups” such as a failed piece of equipment e.g. a “stuck mic”.
Hang time (ms) / Alt Hang time (ms): generally leave this at its default values – those interfacing with repeaters might want to adjust this.
Enable RX Notch Filter / RX Notch Filter: useful if you want to remove unwanted audio artifacts received from your HT. The format is [frequency, bandwidth, frequency, bandwidth …]. The example provided is useful if you are using a Baofeng as your HT.
Use Voice ID: generally your node will ID every 10 minutes, it will transmit your call sign as CW tones. Turn this option on if you would rather your node IDed by speaking your call sign in english.
CW ID suffix: If you want your node to include the “/L” or “/R” suffix as well as your call sign, enter the value here. Our understanding is that the FCC no longer requires this in most situations.
CW ID Interval/Frequency/Amplitude: these values control how often your node IDs, the frequency and amplitude of the CW tones.
Enable audio analysis: This option enables the SOX Audio Analysis functionality on your node which can be inspected in the “Adjust USB Audio Gain for VOIP” screen. See the AUDIO TUNING page for more information. Once you are done tuning your audio, turn this option off to preserve CPU resources for the normal running of your node.
Enable parrot mode: Turn this on to have your node repeat back your transmission over the embedded radio – useful for assessing the quality of your audio. Note this turns this option on permanently, every time your node reboots. You can turn this option on briefly from the Node Details Share/Context menu.
Report stats to AllStar/HamVoIP: Normally leave this turned on – some hub and systems will not allow you to connect if you are not reporting statistics to the network operators. Turn this off if you want to hide the state of your node from the public network.
Auto-connect: These 3 settings allow you to automatically connect to a specific node after boot/startup. The delay is the number of seconds ClearNode waits before initiating the auto connect (Note: this delay is ignored in ASL3). Be careful here that you don’t forget you have this set and then connect to another system using the mobile app or DTMF commands. Cross connecting big systems is a sure fire way of making yourself unpopular.
Deny/Permit Mode / List: A comma delimited list of node #s that you wish to explicitly permit inbound connections from, or, deny inbound connections from. If you set a Permit list – all other node #s will be denied. Be careful not to turn this option on and then leave the list blank – this will effectively stop all outbound and inbound connections.
Enable local DTMF: Even if you don’t use DTMF, keep this option turned ON. If you turn it off you will disable all “functions” in your node – a lot of features will stop working.
Propagate …DTMF / …phone DTMF / Remote DTMF allowed: See the notes at AllStarLink Wiki for explanation of these options – in general they should be turned OFF.
Supermon/Allmon Section
For HamVoIP based nodes Supermon is installed and configured. For ASL3 based nodes Allmon3 is installed and configured. Use this section to configure common items for both installations
Login ‘admin’ psw: For both installations the login username is ‘admin’. Set the corresponding password here. It is set to your ClearNode Key by default.
Web server http port: The default is 80, but you can reset it to any value above 1000. 8080 is another common value.
Titles and Location: These values are displayed on the corresponding service web pages and are informational only.
Telemetry Section
Say IP at boot: With this option enabled, each time your node boots up it will transmit a voice that annunciates your LAN side IP Address – the address you would use for a Supermon, Allmon or SSH connection. Having this option turned is helpful if you are having network connection issues – if it is not announced, or announcing an unusual value, that is a good starting point for resolving network problems.
Enable courtesy tones: Courtesy tones give you audio indications and confirmation of activity on your node, particularly key up/down on the local radio – depending on it’s connection state.
Enable link unkey tone: Whenever the remote user ends their transmission your node will respond with a tone. Some folks find this tone unnecessary and turn it off.
Control tones are set to common defaults before shipping – you can select alternates using the 4 links provided.
Duplex Mode: This generally should be set to “1” for Simplex AllStar nodes. If you want to suppress the 10 minute morse ID announcement set it to “0”. Note that the FCC requires that your node identifies at least every 10 minutes if there is traffic on the radio. The other values are generally not needed by simplex nodes and are included to support future version of the hardware.
Voice Telemetry: When enabled your node will voice announce connections to and from your node, including changes at remote nodes. When set to “On” these announcements can get annoyingly verbose, particularly if you are connected to a busy hub. Setting it to “Limited” will only announce local connection and disconnections and then will silence after 1 minute.
Alt Voice Telemetry: This enables a custom set of connection voice announcements that are more appropriate for ClearNode since they include announcements for the various Digital Modes.
Telemetry Volume: This controls the gain on telemetry and announcements relative to the gain applied to general traffic on your node.
Hold off telemetry: When turned on this option delays telemetry announcements until general voice traffic on your node stops. When turned off, telemetry will be mixed and played concurrently with general voice traffic.
Weather Options Section
Zip for weather: Your ClearNode supports the “*81” and “*82” DTMF commands that prompt your node to announce the local time and weather conditions. Set this Zip Code to the location you want the announcements for.
Enable AutoSky at boot: AutoSky is installed and partially configured in all new ClearNodes. To use it you must enable it at boot and configure the appropriate “National Weather Service County Code” for your station. If you ordered your ClearNode pre-configured this County Code will already be set.
NWS County Code: You can find your Count Code at the NWS website at “alerts.weather.gov” website. Typically the code is 3 capital letters and 3 digits.
Play Wx every (ms): If there is an active weather warning for your station and if your node is not busy, the warning will be announced over your ClearNode’s built in radio every so many milliseconds.
Play Wx after busy delay (ms): If your node is busy with QSO traffic at the moment that AutoSky wants to transmit a warning, it will wait this many milliseconds after your node becomes idle to make the transmission.
Note: You must also turn on the “AutoSky Check Advisories” Timed Event in Timed Events Setup – this enables the crontab which checks for advisories every so many minutes.
SkywarnPlus Options Section
SkywarnPlus is an advanced weather reporting system now implemented in all ClearNode devices. It comes with a multitude of options that are too numerous to fully document here. Head over to their Github site for a full explanation. We will explain the most important items here only.
Enable SkywarnPlus: Since you have the option to use SkywarnPlus or AutoSky (but not both) – here’s where you turn it on.
Generate Configuration File: If you are enabling SkywarnPlus you should also turn on this option. It’s provided for folks who want to manage the configuration file themselves, in which case turn this option off.
Enable Test Mode: Typically keep this turned off unless you know why you are using it.
Enable SkyDescribe: This enables a series of voice announcements that are generated from the NWS Alert Text – you need an account at voicerss.org and one of their API keys to use this option.
Enable Automatic Courtesy Tones: be aware that if you turn this on you will disable all your Telemetry courtesy tone options, since this feature will take over those options. Our experience has been such that we don’t encourage using this option.
Select NWS Alert Types: There are many, many types of Alerts and we enable a default collection. However, our defaults may or may not be appropriate for your location – for example “Coastal Flood Advisory” isn’t much use if you live in Montana.
Streaming Audio Setup Section
Enable streaming audio: We at Node-Ventures maintain an Icecast server in our data center. If this option is checked your node will automatically connect to that server and publish an audio stream of all the traffic on your node. You can access this stream from your mobile device by returning to the Node Detail screen and tapping the Play button in the top right hand corner. The audio stream is delayed by about 20 seconds. To turn off the stream, return to the Node Detail screen and tap the Pause button in the top right hand corner. Note that the audio will continue to be streamed to the server wether you are listening to it or not. If you are concerned about mobile data consumption, return to the Node Setup screen and disable this option.
Streaming Mode: You can configure your audio to stream to your personal account and stream endpoint at Broadcastify. You will need an account and a stream pre-configured at Broadcastify. See the help sections at Broadcastify to get this configuration complete. The following “BCFY” configuration items will displayed on the “Technicals” tab of “Manage Feed” page for your stream on the Broadcastify website.
BCFY Url:Port: This is the destination URL that ClearNode will send your stream to – in other words your streams input.
BCFY Mount Point: You may have multiple streams at Broadcastify – they are uniquely identified using this value.
BCFY Password: Each stream requires a password assigned by Broadcastify.
BCFY Stream Name: Some description for your stream
BCFY Play Url: If you want your stream to play in your ClearNode app in the same way as the standard ClearNode stream does, you must set this Url so the ClearNode mobile app knows where to connect to play the stream. Discovering it is a little tricky – and differs if you have a free or paid account with Broadcastify.
EchoLink Setup
In the Node Details screen select the “EchoLink Setup” option.
We will not go through the detail of the EchoLink setup – most of it is self explanatory. Note that “Call”, “Password” and “EchoLink node #” are the 3 important values and must be set correctly for EchoLink to function. The rest of the values are for display purposes and aren’t validated.
Note that there are 3 variations of your call sign at Echolink e.g.: W6WNG, W6WNG-L, W6WNG-R – each must be “validated” separately at EchoLink, they will not be usable until they have. EchoLink is now requiring that ClearNodes must use the -L or -R version (sysop mode). It is typical to use the “-L” version on a simplex node like ClearNode. The current versions of the ClearNode mobile apps will not allow you to use the non-sysop version of your callsign.
Latitude/Longitude: EchoLink has become more pro-active about these settings being properly populated. You don’t have to publish the Lat/Long of your house, but you might locate it somewhere generic in your City or Town. Note that you should ONLY use the decimal notation for Latitude and Longitude – degrees, minutes and seconds are not permitted.
Announce mode: At the bottom of the “EchoLink Setup Section” – EchoLink provides a secondary option that allows connect/disconnect announcements to state the Node #, or optionally, the Callsign for the connection. Note that “Voice telemetry” in the “Telemetry Section” must be enabled for this option to have any effect.
Operating System Setup
At the bottom of the Node Details page is a link to the “Operating System Setup” page. We will be implementing configuration of the Raspberry Pi’s Linux operating system on this page.
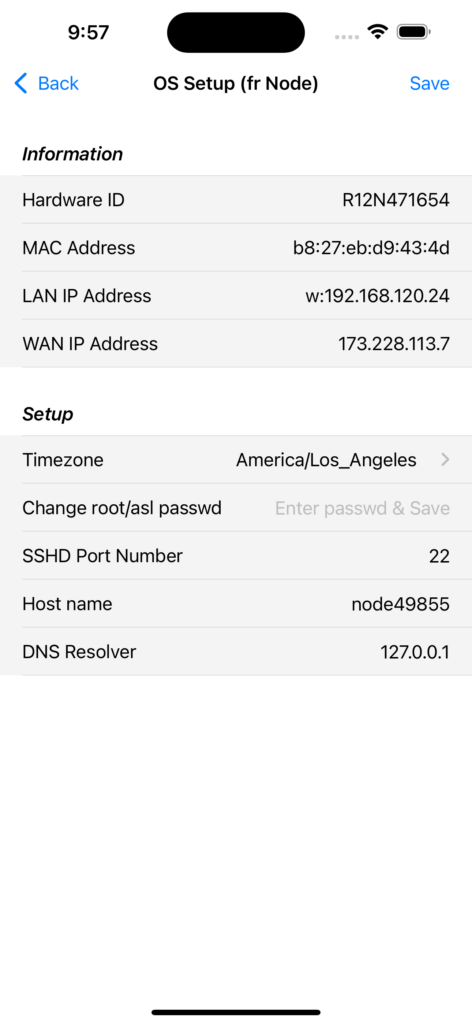
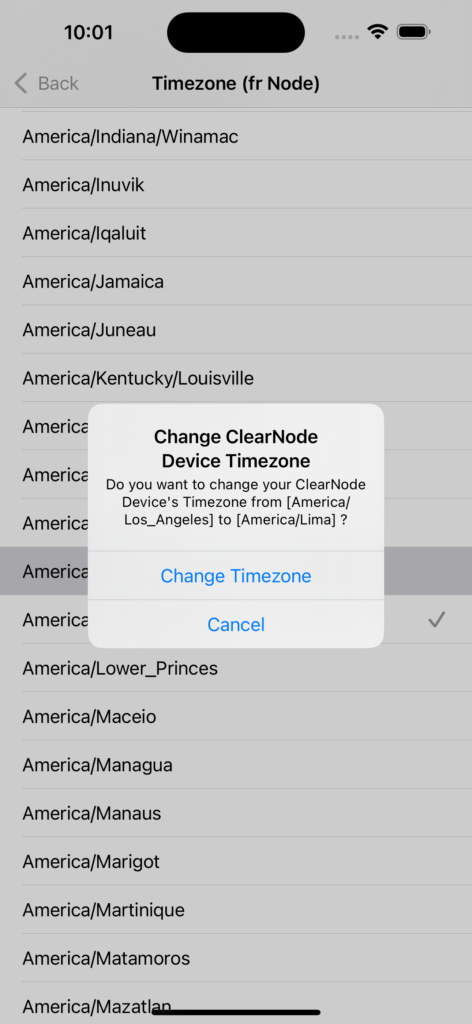
Timezone: You can choose the timezone for your node using the picker linked from this item. Most “Servers” in modern computing systems are set to UTC aka Zulu time so that their logs are co-ordinated with all other servers despite their physical location. However, you can chose your local time if you prefer.
Change root/asl passwd: You can reset the password to your node’s operating system via this setting. The “asl” user is only appropriate for ASL3 based nodes.
SSHD Port Number: If you use SSH to access your node, you can specify a non-standard port number here, the default is 22. This provides some “security by obscurity” if your node is accessible from outside its LAN network. Given the modern internet environment of mass hack attacks, it’s not generally advisable to expose your node through your firewall except for specific ports that relate to AllStar and EchoLink traffic.
Host name: This is set to “node” + [node number] before shipping, but you are free to rename the host as you wish.
DNS Resolver: In general leave this configured to “127.0.01”. This means your node will resolve network addresses via the service indicated when your node acquires an IP address via DHCP. Some users may want to customize this to the address of a DNS Server of their choice.