Introduction
The ClearNode mobile apps for Apple iOS and Android smart phones eliminates the need to use DTMF tones to control your node, and, SSH and editing configuration files to configure the various software systems on your node. Note that you should NOT use the legacy method of editing configuration if you are going to use the ClearNode mobile app – the 2 methods conflict.
The ClearNode app does not communicate with your node directly. It uses a central message hub to propagate messages between your mobile app and your ClearNodes. Messages always travel through the hub first.
These messages are ONLY propagated when both your mobile app and the node are online and able to communicate with the Message Hub. Thus your node will only be listed in the mobile app when both are connected to the internet.
Your Nodes screen
(If you only have one node, likely this screen will be automatically skipped and you will be navigated to the Node Details screen. You can return to the Your Nodes screen using the back link in the top left corner. You can turn off this “Navigate to default node” behavior in the settings screen – tap the gear or wrench icon in the top right corner of the Your Nodes screen.)
A node that is highlighted in yellow is receiving from the Allstar network and transmitting over the embedded UHF radio
A node that is highlighted in light blue is receiving from the embedded UHF radio and, if connected to a remote node, is forwarding that audio to the remote node.
Tap on any node to navigate to the Node Details screen for that node.
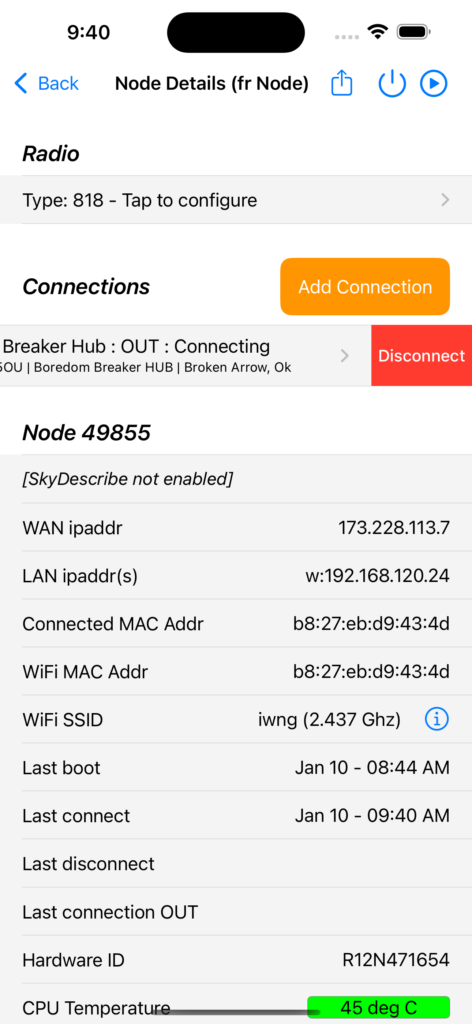
Node Details screen
This is the primary screen for controlling your node connections and initiating the various setup screens to configure the AllStar, EchoLink and DVSwitch digital modes software.
If the Radio is highlighted in yellow it is receiving from AllStar or EchoLink and transmitting (Tx) RF over the embedded radio. If it is highlighted in light blue it is receiving (Rx) RF from the embedded radio and sending that audio out over the AllStar or EchoLink networks.
If a row in the “Connections” section is highlighted in dark blue, it is the active connection that is sending audio on the Allstar network.
Node Detail Screen: Popup Menu
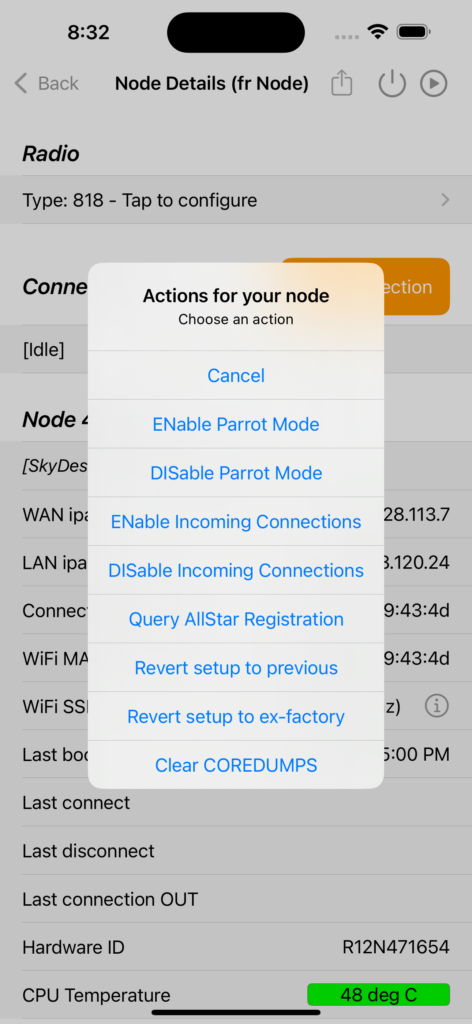
This menu is activated by tapping the “Share” icon in the top right corner of the Node Detail screen. It provides a selection of actions, including temporary settings you can ENable and DISable on your ClearNode. These temporary settings will revert to the defaults when the node reboots.
ENable/DISable ParrotMode: this mode will transmit back the last audio it received from your HT – useful for checking that HT and node are communicating correctly.
ENable/DISable Incoming Connections: useful for temporarily stopping other users from connecting inbound to your node (AllStar only). Note that you must have your “IAX Port” forwarded through your WiFi/Router before ANY inbound connections are allowed. This setting has NO effect if Port Forwarding is not already configured.
Query AllStar Registration: a useful tool for debugging problems when your node won’t connect to remote nodes. It will return the output of the “iax2 show registry” as if it was entered at the “asterisk” command line interface. See the AllStar documentation to understand the output of this command.
Revert setup to previous: every time you send a new configuration to your ClearNode, the existing values are saved off to files with “_last” added to the end of the file name. Using this “Revert” process deletes the existing files and puts the “_last” files in their place. Use this option if your most recent set of changes had some unintended consequences.
Revert setup to ex-factory: after testing is complete and immediately before we ship our node to you, we save of these “ex-factory” configuration files to a special set of files with “_factory” appended to their files names. Use this option as a last resort if your configuration is in a non-functional state and you just want to start over with a “known-good” set of values.
Clear COREDUMPS: this is rarely needed, it clears error logs occasionally generated that appear in Supermon.
Configuring the embedded radio transceiver
Tap on the Radio > Type: 818 row to navigate to the Radio Setup screen.
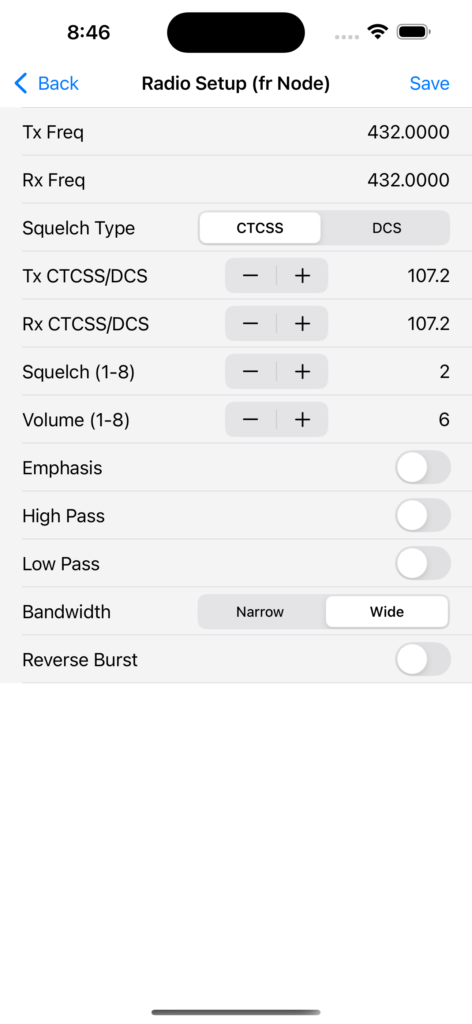
Adjust the radio parameters as needed and tap the save icon in the top right corner of the screen. BEWARE: Do not interrupt power to the node until the update is complete – if you do, you will likely “brick” the logic components of the 818 radio and it will have to be replaced.
Connecting outbound to another Node, Hub or Digital Endpoint
Tap the “Add Connection” button. The Add Connection screen is a 3 position tab bar, one tab for each of AllStar, EchoLink and Digital. Tap the appropriate icon at the bottom of the screen to select the target network you wish to connect to
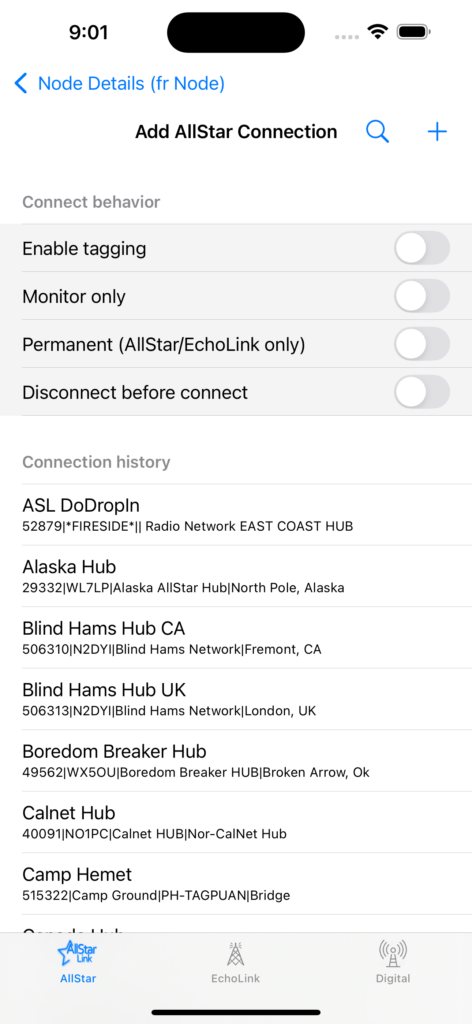
You can pick a previously used connection by tapping on it – this screen will remember connections you have already made. If you want to add a new connection that you have not previously visited, tap the “+” icon in the top right corner of the screen and fill out the “Add new connection” dialog. Tap “Add to table” and your node will attempt a connection, if successful the new connection will be added to the table for future use.
Connecting to EchoLink
Tap on the EchoLink tab at the bottom of the screen. Note the slightly different format for EchoLink node numbers – they must begin with an extra “3” with the rest of the node number padded to the left with “0”s for a total of seven digits. For example the Echo Test Server “9999” would be entered as “3009999” and the East Coast Reflector would be “3375103”.
Connecting using the Digital Modes e.g DMR/STFU
See the DIGITAL MODES page for an explanation of connecting to the Digital networks.
The Add Connection Switches
At the top of the ADD CONNECTION screen are four switches that affect how connections are prsented and how they are controlled.

Enable tagging: When tagging is turned on you can tap on a past connection and provide it with meaningful tag name to help you identify it – particularly useful in the digital modes.

Monitor only: This affects how connections are initiated, when it’s turned your connection will only receive traffic from the target connection and will not allow your traffic to pass out to the connected node. There are some EchoLink hubs that require this setting, since they do not allow inbound traffic.
Permanent (AllStar/EchoLink only): As indicated this setting only affects AllStar and EchoLink connections. Poor internet connections with limited bandwidth or “laggy” performance often cause accidental disconnections. Turning Permanent on forces the node to re-connect to the target node if it gets accidentally disconnected.
Disconnect before connect: This setting is particularly useful for novice users – if you are new to nodes like the ClearNode, may we suggest you keep this setting turned on. When turned on, and you attempt to connect to another node, it will check to see if you are already connected to a node and disconnect it. This prevents you from accidentally connecting to multiple nodes and bridging their traffic – an excellent way to make yourself unpopular !
How to Disconnect an existing connection
The process varies slightly between Apple iOS and Android. For iOS – swipe left on a connection row to reveal the “Disconnect” button. For Android long press the connection row to activate the Disconnect dialog.
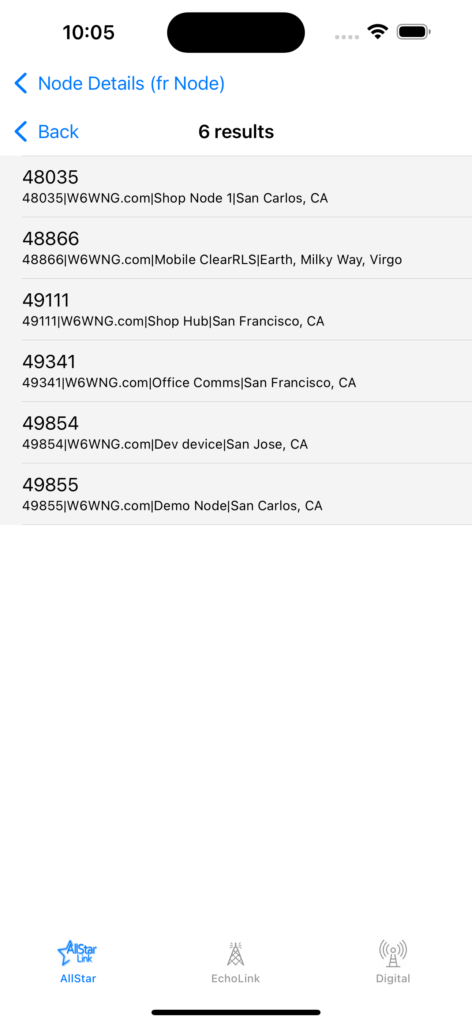
Searching for Nodes to connect to
The “Add Connection” screen includes a search function that allows you to enter search text and search through the AllStar, EchoLink and Digital node lists. Select the network type by tapping the relevant icon at the bottom of the screen, then tap on the spy glass icon in the top right corner of the screen to reveal the search dialog.
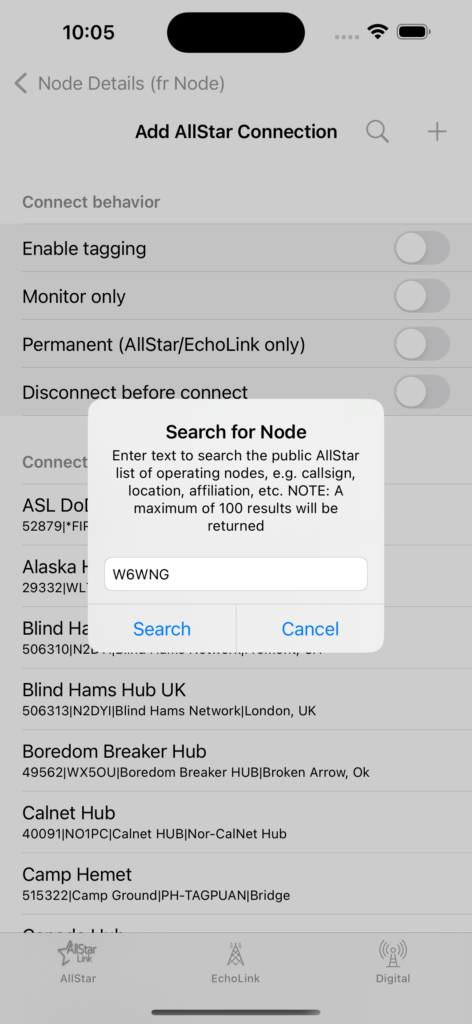
After the search, a results table appears, tap on any of the results to attempt a connection and return to the “Node Detail” screen. Note that nodes go online and offline continuously. Also, not all nodes are configured to accept incoming connections – you may find that despite being listed in the search results, the attempted connection fails.
Versions – Software Updates
We are constantly updating, fixing and adding new features to the system. We strongly encourage you to keep up to date as the new software is released.
There are 4 discreet parts to the software used to run the ClearNode mobile app and the ClearNode Raspberry Pi device:
- The iOS and Android Mobile software
- The RedNode control software on the ClearNode Raspberry Pi device
- The AllStar / EchoLink VOIP software and underlying operating system
- The DVSwitch MMDVM_Bridge and Analog_Bridge for Digital Modes
The iOS and Android software will update automatically if you have automatic updates enabled in the mobile device of your choice. You can also go to the appropriate app store, search on “ClearNode” (one word) and manually initiate an update. We strive to release the mobile software “backwards compatible”, so that we don’t break previous versions of the RedNode control software. (Ha! Famous last words.)
The RedNode API Level and the RedNode Code Revision relate to our proprietary control messaging software that implements control and configuration between the ClearNode Mobile App and your ClearNode device. It is VERY important to keep this software up to date. There are 2 automatic methods your node employs to stay up to date. Firstly, in the AllStar Setup > Red Node Interface the “Enable Automatic RedNode Updates” switch, if set to ON, will cause the node to call home and check for the latest software when it reboots. It will update and reboot if necessary. Secondly, when your ClearNode mobile app first displays your node it checks its RedNode API Level, if it’s out of date it will offer you the update to you on the screen. You are STRONGLY encouraged to accept the update !
You can also manually tap on the row that displays the “RedNode API Level” and it will offer to attempt an update. If you are already updated to the latest, it will reboot but nothing will change.
Similarly tap the “Asterisk …” table row to update the AllStar / EchoLink and underlying operating system software.
IMPORTANT: For the ASL3 software installations, the package updates can take a long time – several minutes – do NOT interrupt power during the update – wait till it is completed and the node has rebooted. If you interrupt the update you may corrupt the software on the node and necessitate replacement of the SD Card. To ward against this we do display a clear visible clue in the Node Details screen when the node is updating.
In general, the DVSwitch Digital Mode software does not require updating, unless specifically announced in the “What’s new …” section of the website, or it will be automatically updated as part of the Asterisk package updates.
ClearNode Mobile App Settings
There is a collection of settings that control the behavior the ClearNode mobile App. At the top right corner of the “Your Nodes” screen is a cog icon in iOS and a wrench icon in Android – tap the icon to access these settings and preferences.
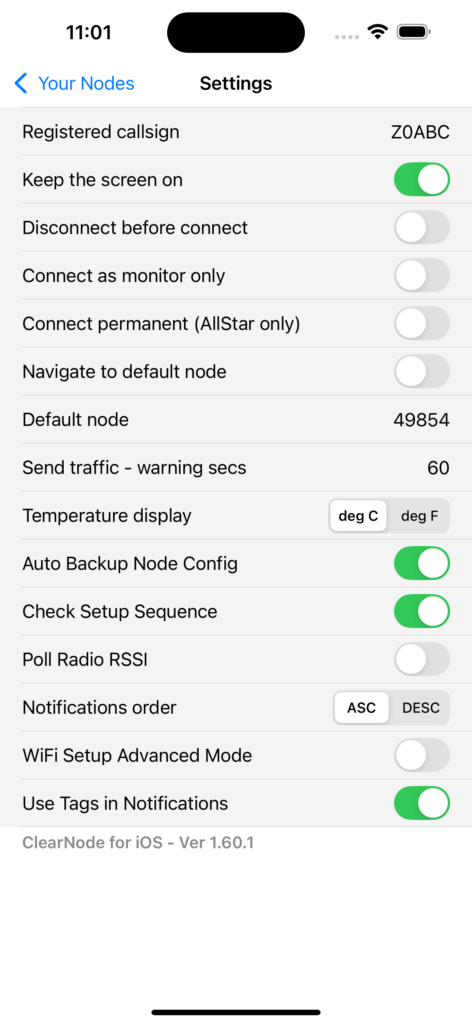
Registered callsign: cannot be edited – for information purposes only.
Keep the screen on: prevents your phone from going to sleep when you are viewing the “Your Nodes” or “Node Detail” screens – useful if you are monitoring your connections continuously.
Disconnect before connect: turning this on forces a disconnect of any current connections before connection to a new remote node – helps you avoid accidentally cross-connecting systems. Note this has no effect on connections directed via DTMF commands.
Connect as monitor only: this affects the way new connections are started – they will be receive only, you will not be able to send traffic to the connection – useful if you want to listen to a hub without risking sending interference or accidental keyups.
Connect permanent: changes the behavior of outbound connections – when on, connections that drop are restarted. We generally recommend leaving this option off. If a Net Controller wants to disconnect your node from their hub because it is generating QRM, and this setting automatically re-initiates the connection – the Net Controller might be tempted to block you either temporarily or permanently. In other words, leaving this setting off is polite as it allows Net Controllers to manage their nets and hubs.
Navigate to default node/Default node: many users have a single node, so the “Your Nodes” screen that lists your nodes is a little redundant. Turn this setting on to have your ClearNode mobile app bypass the “Your Nodes” screen and immediately navigate to the “Node Details” screen. Even if you have multiple screens you can use this feature to keep focus on your most important node.
Send traffic warning secs: (No longer used and will be removed in a future version.)
Temperature display: switches between displaying temperature values in Celsius versus Fahrenheit.
Auto Backup Node Config: When turned on your node’s configuration will automatically be sent to our backup server when you Save it to your node. This is good insurance against a failed SD Card – we can generate a fully configured new card for you using this information.
Check Setup Sequence: Most of your node’s configuration – Setup, WiFi, Notifications – are stored both in your node and your copy of the ClearNode Mobile App. The App automatically compares these revisions and warns you if you revision on the node is older than the one stored in the mobile app. This can get out of a corner if you have to replace your SD Card and allow you to re-configure the node with the last good configuration stored in your App before the SD Card failed.
Poll Radio RSSI: (Use this setting infrequently and sparingly.) When turned on this setting will have your node continuously poll it’s built in Radio Transceiver for the RSSI level of the RF signal it is receiving – this will then be displayed in the Radio section of the Node Details page. This process consumes a lot of resource on your node.
Notifications Order: When displaying multiple Notifications from your node you may control what date/time order they are presented in the table.
WiFi Setup Advanced Mode: In general, keep this turned off, you are unlikely to need it and it can confuse the uninitiated.
Use Tags in Notifications: In the Add Connection screen you can tag destination node numbers and identifiers with text that are more meaningful to you. When this setting is turned on, these tags will also appear in Notifications that relate to connections.
Backing up your ClearNode Mobile App Data
As mentioned above, most of your nodes’ configuration is also stored in your copy of the ClearNode Mobile App. Some information, “Tags” for example, are only stored in your mobile app. You can backup this information to our severs separately from the backups you made from your individual node devices.
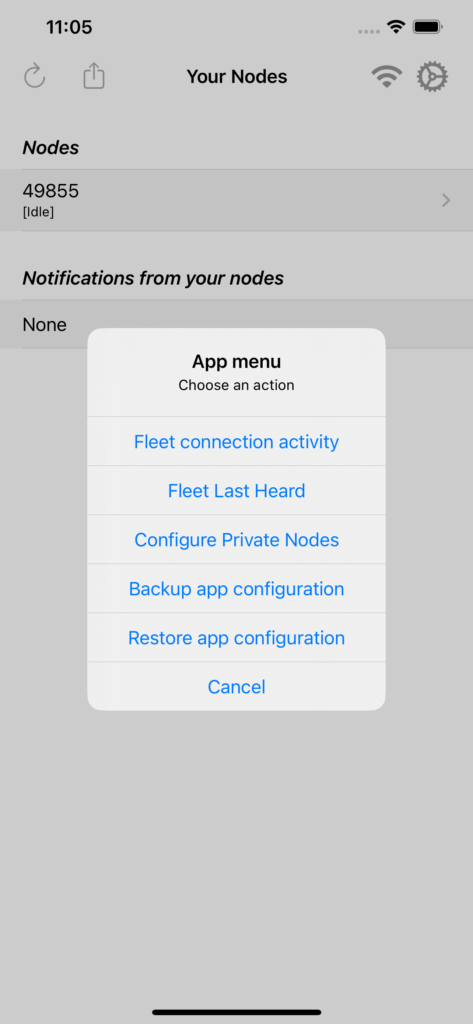
On the “Your Nodes” screen, tap on the Action menu icon in the top left corner of the screen. From the dialog chose the appropriate action. Backup will place a copy of your mobile app’s data on the Node-Ventures server associated with your callsign. Restore if you have to re-install your mobile app for some reason. You can also use backup/restore copy your app data from one mobile device to another – backup on the first device and then restore to the second device. We store a single mobile app backup with your callsign – the backup is NOT stored individually for each mobile device.
Configure Private Nodes
When your node wants to connect to another node it needs to convert the node number you provide to a network address that allows all the network equipment along the way to complete the connection. When the destination node is on the other side of an internet connection, your node has to perform a lookup to get that address from the AllStarLink.org registration servers. We all register with AllStarLink.org so we can find each other.
This is NOT the case where the two nodes that want to connect are on the same Local Area Network (LAN) e.g both nodes are connected to the network in your house or office. AllStarLink.org does not provide lookups for those situations. The AllStar software provides a work around in these situations – the lookup is performed on your own node via a table of entries in the node’s configuration. That table of entries needs to be explicitly created so nodes inside your own network can find each other. The ClearNode software can automatically generate this table for you. From the “Your Nodes” screen of the mobile app tap the Share menu icon in the top right corner and choose “Configure Private Nodes”.
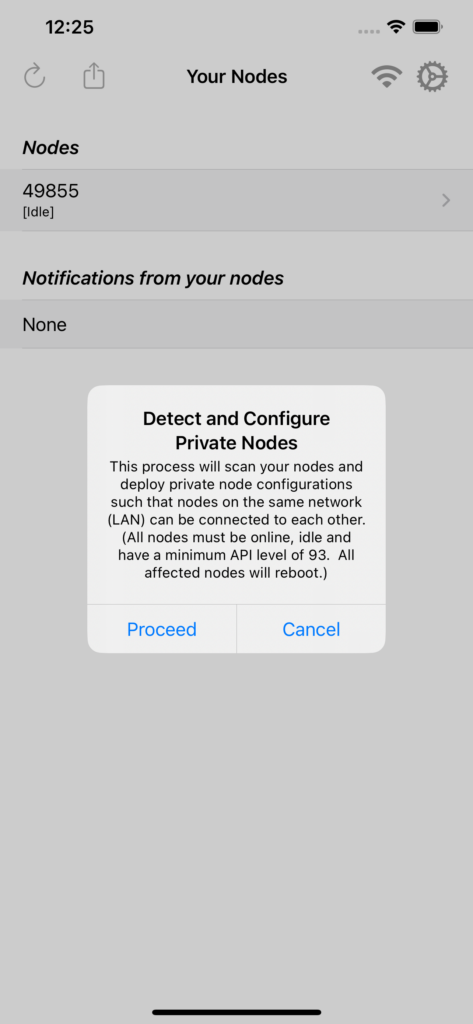
The import thing to emphasize here is that all the nodes that will participate in this process must be online on the internet so they can be discovered. After being re-configured each node will be rebooted. Once back on line each node will have static references to the other nodes on your private network and should be able to connect to each other.
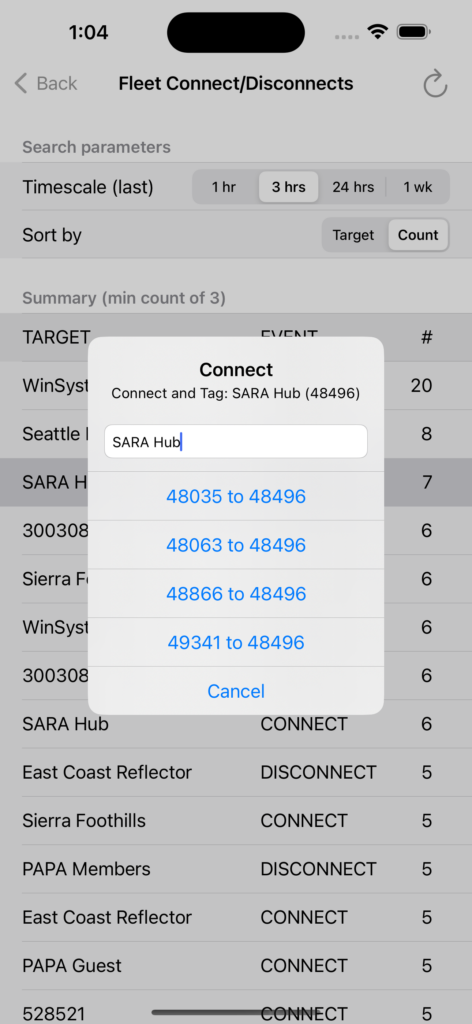
Fleet Last Heard and Fleet Connection Activity
We often hear that new users to ClearNode and AllStar have difficulty find the “action” where they can participate. The Fleet Last Heard screen provides a live list of the ClearNodes that are actively conducting QSOs. If the nodes are in your Tag List, your tag will be displayed in favor of the node #s.
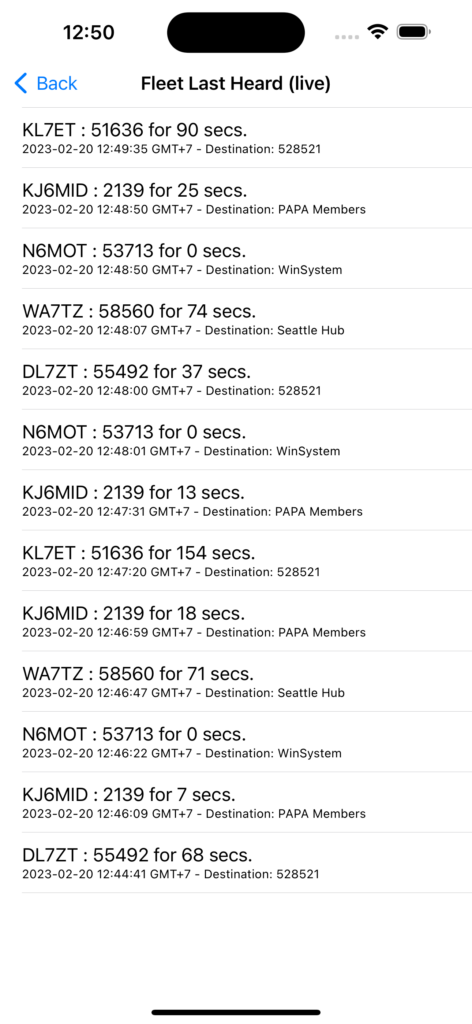
The Last Heard screen only features those connections where the user is actively transmitting – a lot of people prefer just to listen – folks that listen only still have to connect ! The Fleet Connection Activity lists the nodes and hubs that have received connections or disconnections from ClearNodes in a recent timeframe. You can specify the timeframe you are interested in and how the results should be displayed – in order of the number of connections or in alphabetic order of the hub node # or your own Tag.
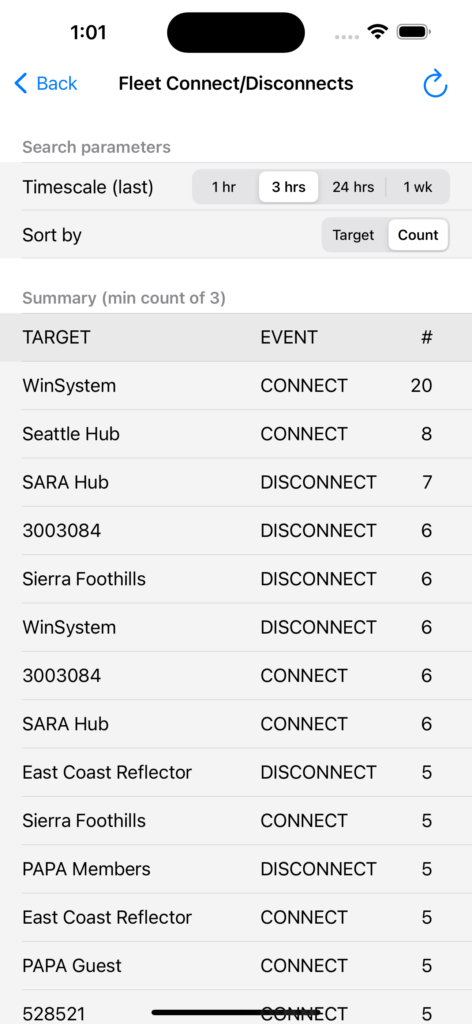
You can click on any row in the table to initiate a connection to that destination from your own node.
Powering Down and Rebooting your Node
It’s advisable to explicitly Shutdown your node before pulling power – just as you would for your PC or Mac. This reduces the chances that your SD Card will get corrupted necessitating its replacement.
In the top right corner is a power icon – a circle with a line in it – tap on it to reveal a popup for choosing the appropriate action.
If you choose “Shutdown”, you will get a secondary popup asking for confirmation – this is to prevent folks from accidentally shutting down a remote, unattended node that will need a physical visit to restart.