Introduction
Timed Events allow you to schedule certain node activities, like connections and disconnections to remote nodes, on hourly, daily, weekly and monthly repeating schedules. This initial release focusses on connecting and disconnecting from other nodes. However, as we learn from you the ClearNode users, we’ll implement support for other popular use cases.
Relationship with CRONTAB
Since ClearNode is implemented using the Raspberry Pi controller and runs the ArchLinux operating system – Timed Events are implemented using the standard CRONTAB service. As such Timed Events also support creating events that execute arbitrary linux shell commands.
When you receive your ClearNode you will note there are several disabled Timed Events already installed – you may need to enable these events, or you may use them as examples for your own events.
Managing Timed Events
Tap into the Node Detail screen and scroll to the bottom of the page – tap on the “Manage Timed Events” item.

Each row in the table is 1 event identified by its “Comment”. On this page there is also an on/off switch which enables or disables the event. Note that any changes you make on this page on the Timed Event detail page will not take effect until you tap the “Save” link in the top right corner of “Timed Events” screen. If you exit this screen without saving the changes, your changes will be lost.
Creating a new Timed Event
Tap the “+” symbol in the top right corner of the “Timed Events” screen – a new event will appear in the list. It will default to creating a daily “Connect To” event set for 10:00 hours local time.

Tap on the new row to enter the edit screen. Again, any changes you make here are local only – you must tap the “Save” link in the top right corner of the “Timed Events” screen to commit changes to the node.
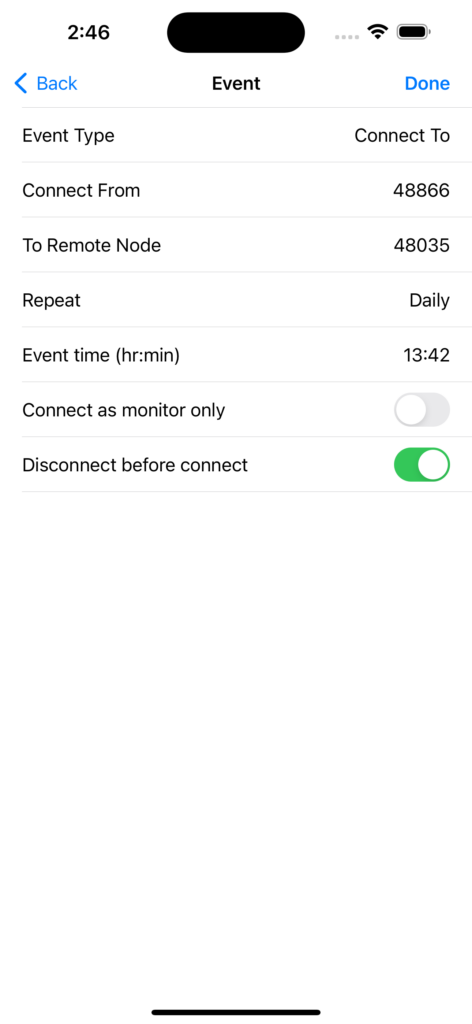
Tapping on “Event Type”, “Repeat” and “Event Time” will activate appropriate pickers as seen below – select by “spinning” the picker up or down. You will see that the pickers are linked e.g. if you select “Weekly” the “Event Time” will transform into a 3 column spinner for day of week, hour and minute.

Note that the spinner for the “Hourly” Repeat has some special values at the very end of the spinner – “*, */5, */10, */20, */30” – these selections represent “every minute, every 5 minutes, every 10 minutes, etc” respectively.

There is a special Repeat mode called “Reboot”. When you select this mode the “Event time” picker will be disabled and set to “After reboot”. This type of Timed Event will fire 30 seconds after the node reboots (or power’s up from cold).
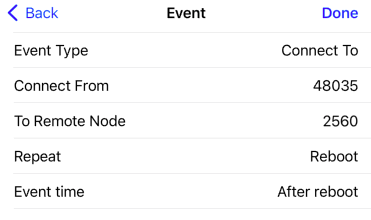
The “To Remote Node” field is where you would input the AllStar or EchoLink node # you wish to connect to. Don’t forget that EchoLink node numbers have the format 3001234 – 6 digit node number, packed to the left with zeros, all prepended with a “3”.
To delete Timed Event, navigate to the “Timed Events” screen, swipe left on the event to be deleted and tap the “Delete” button that appears on the right.

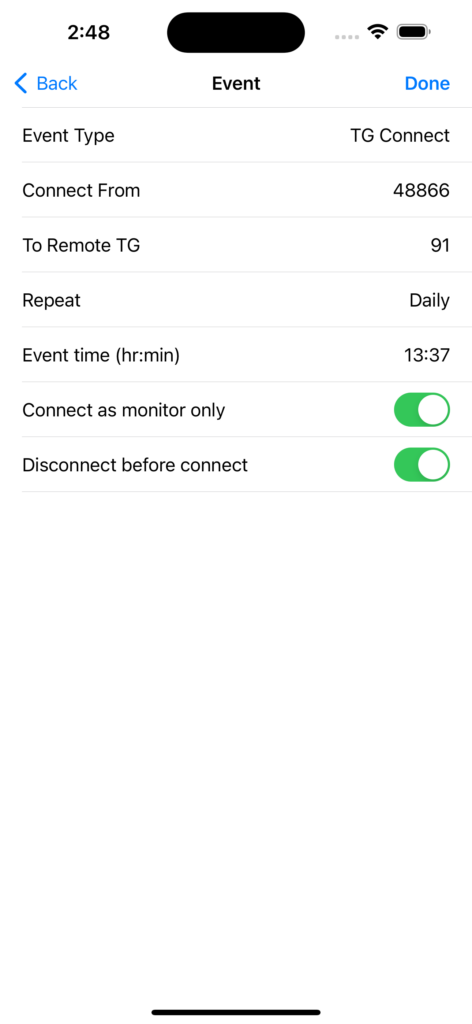
There is a special case for connecting to Digital Mode endpoints – Event type: “TG Connect”. When this option is selected your node will be connected to the TG or Reflector ID entered in “To Remote TG”. Note that your node can connect to several types of Digital Modes. Your node must be configured for the Digital Mode that your “To Remote TG” refers to – the Timed Event will NOT reconfigure your node for the appropriate Digital Mode before attempting the connect. For example if you want to connect to Brandmeister TG91 WorldWide – you enter “91” in the “To Remote TG” and your node must already have the Digital Bridge enabled with “AMBE Mode” set to “STFU” (use “DMR” for TGIF etc).
Important Notes on using Timed Events
Beware using Timed Events to automatically connect to a big Hub, Talk Group or Reflector. There have been too many cases where the user has forgotten that they have set a Connect Timed Event, and when it fires they are already connected to another hub etc. Without noticing they have cross connected two major hubs – that’s a very good way to get banned from both hubs ! Best practice is to use the “Disconnect before connect” option or have a separate “Disconnect All” Timed Event that fires a couple of minutes before your “Connect” event to make sure you’ve cleared out all existing connections BEFORE you connect.
Timed Events operate outside of the mobile app – they are essentially Linux Shell Commands that fire even when your ClearNode Mobile app is not running. That means that they do NOT respect the “Monitor only”, “Permanent …” nor “Disconnect before connect” settings in the “Connect behavior” section of the “ADD CONNECTION” screen in your mobile app – you must set those options individually when creating and editing the Timed Event.