Quick method for adding a new WiFi Network
If your node is currently located where it can “see” the new WiFi network you can command it to search for WiFi Networks, chose the new network and then enter the WiFi Password. The network will be added to the list and your node will reboot. Navigate to Node Details > WiFi Networks Setup and tap on the search/spyglass icon.
Wait a few moments while the node searches for all the WiFi networks that it can see (ClearZero, ClearAlpha and early Pi 3B based ClearNodes will only see 2.4 Ghz WiFi networks).
Tap on the network you wish to add to your node and enter the WiFi password, then tap Save. Your node will reboot.
IMPORTANT TO KEEP IN MIND
Your ClearNode mobile app can only manage and make changes to your ClearNode device when BOTH are connected to the Internet. You must make changes to your ClearNode’s WiFi configuration BEFORE it loses connection to the Internet. For example – if you’re going mobile and intend to use your hotspot – make sure your Hotspot WiFi Name (SSID) and password are added to your node BEFORE you leave your home WiFi.
REMEMBER: If your ClearNode loses it’s connection to the Internet – plug it into your WiFi router with an ethernet cable and power cycle the node – have an ethernet cable in your “go bag”.
REMEMBER: All ClearNode devices support our proprietary WiFiByLight process – you can send WiFi details to your node using the torch/flashlight built into the camera on your Android or iOS mobile phone. Here’s a video that illustrates the process.
Introduction
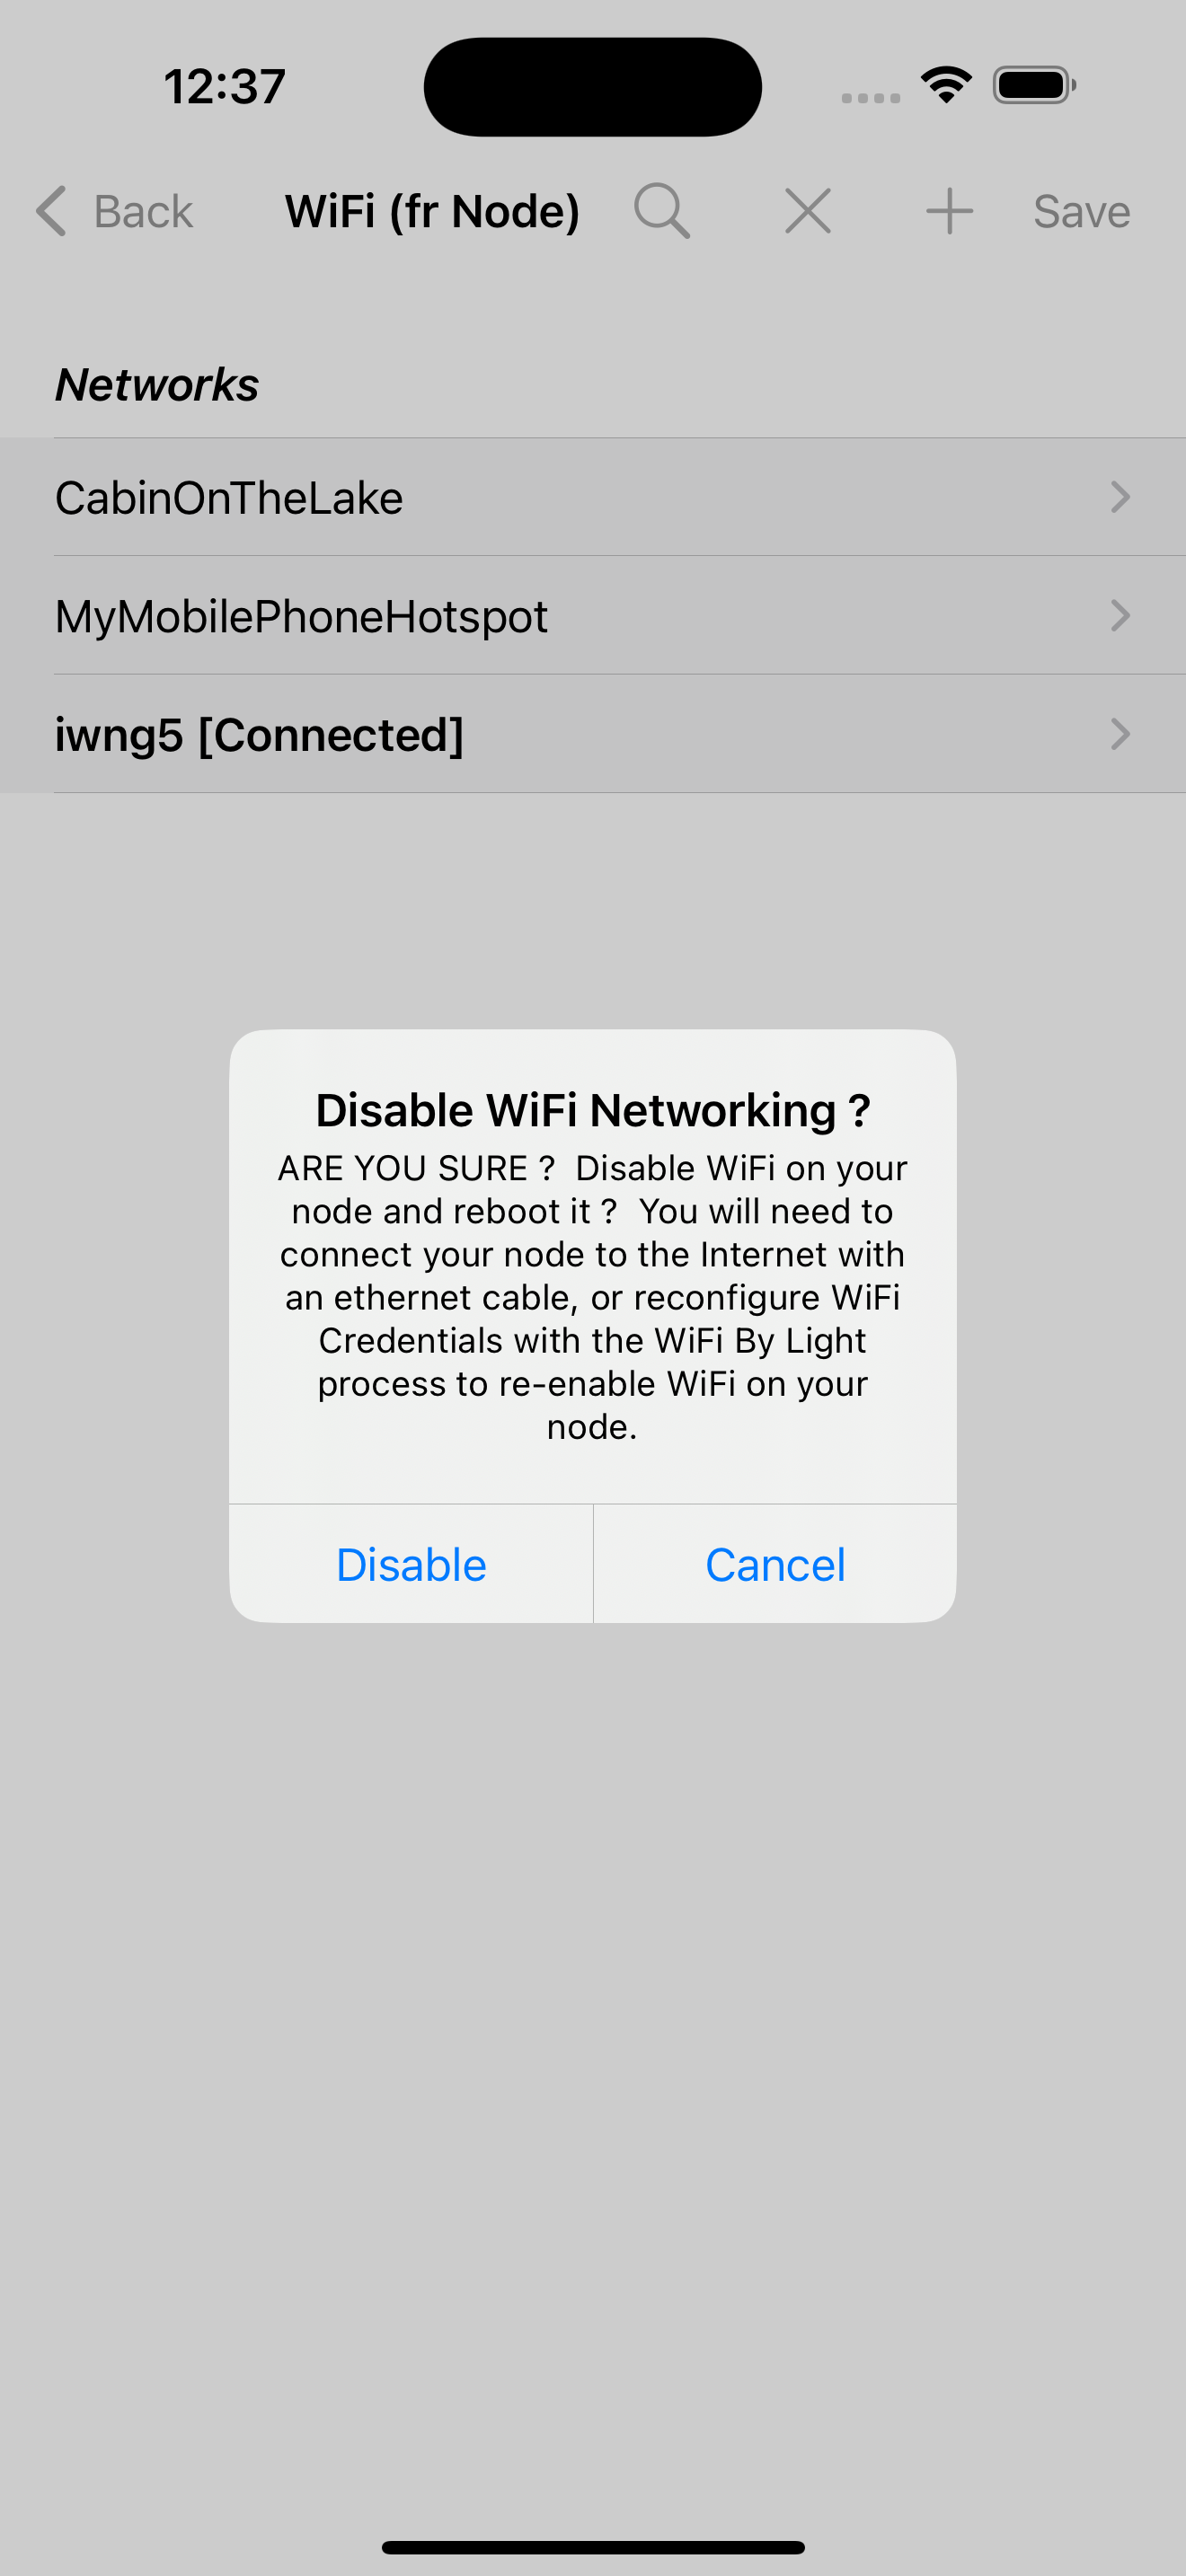
A copy of your node’s WiFi configuration is retained in your Mobile App as well as on the node itself. We treat the configuration on the node as the master configuration, if it is present. If the node has no WiFi Configuration, we display any values that are stored in the Mobile App. Check the title of the “WiFi Networks” screen in the App – if it says “WiFi (fr Node)”, you are looking at the values from the node. If it says “WiFi (fr App)”, you are looking at the values stored in the App (which will be the case if WiFi is disabled on the node, see below).
List all your WiFi network credentials in the ClearNode’s configuration file
Navigate to Node Details > WiFi Networks Setup
The ClearNode mobile app allows you to configure multiple WiFi networks on your node – so add all the networks you foresee using, and update the list regularly, remove unavailable networks and add new ones. Be sure to do this BEFORE your node loses connection to WiFi.
This is a 2 step process – you must complete both steps to properly configure your node. First of all tap the “+” button in the top right corner to enter the details of your WiFi Network.
Be very careful to accurately input the name and password – both are case sensitive – make sure you properly capitalize where appropriate.
After you have listed all your networks in the mobile app – you must send them to the node by tapping the “Save” icon in the top right corner.
Your node will reboot and activate the WiFi according to your choices. If your node does NOT reboot – you have not completed the process.
HamVoIP versus ASL3
The add/edit network screen above is taken from a HamVoIP based node – note the fields “Hidden WiFi Network” and “Priority”. Priority is of particular interest – the higher the number you put here the more likely the network will be chosen for connection when more that one of your configured networks are “visible” to the node.
If your node is based on AllStarLink V3 (ASL3) – the add/edit network screen will look slightly different.
Note that there is no provision for Priority and Hidden Networks. This is because we have used a different WiFi Management system in ASL3. (For you tech savvy users – “wpa_supplicant” is used by our HamVoIP nodes and “IWD” is used by our ASL3 nodes.) In the latter case your node will automatically pick the network with the highest signal strength and the highest level of encryption.
Disabling WiFi
Do not run WiFi and an ethernet wired connection at the same time during normal operations !! If you are using an ethernet wired connection you can disable WiFi by tapping on the “X” in the top toolbar and follow the prompts.
2.4 Ghz versus 5 Ghz WiFi Networks
The first iteration of the ClearNode hardware was based on the Raspberry Pi 3B – it’s WiFi hardware only supported 2.4 Ghz networks. Subsequently we began shipping the Raspberry Pi 3B+ – this version supports both 2.4 and 5 Ghz Wifi. ClearZero does not support 5 Ghz WiFi – only 2.4 Ghz. ClearNodes based on the Raspberry Pi 4B and 5B both support 2.4 Ghz and 5 Ghz. WiFi.
Managing iPhone Hotspot Connections
Getting your ClearNode connected to your iPhone hotspot can be a little tricky. In an earlier version of Apple iOS, Apple made some big changes to the hotspot functionality to enhance security. In particular, non-Apple devices are treated rather differently than your typical MacBook or iPad. Your iPhone hotspot is not discoverable by non-Apple devices, including ClearNode, except in specific circumstances. Below is an image of an iPhone hotspot screen (Settings > Personal Hotspot).
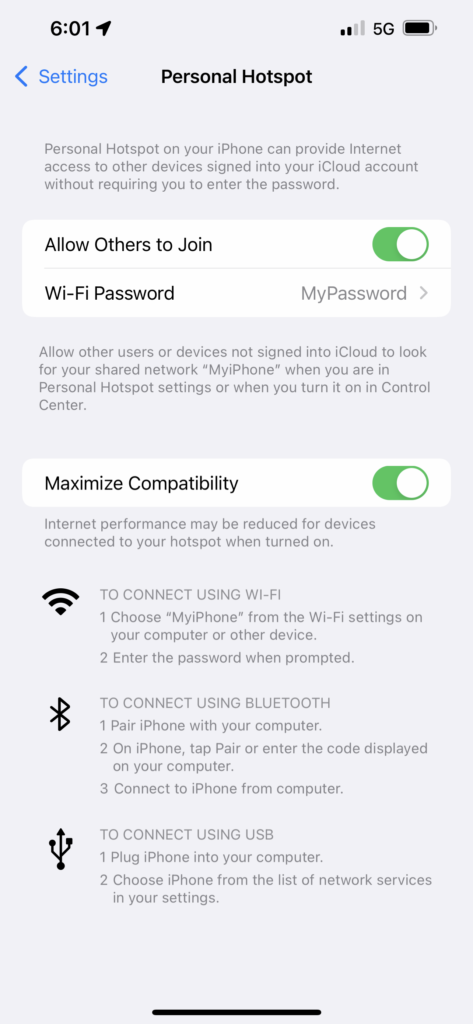
Make sure WiFi is turned on – or your ClearNode will not be able to connect to your iPhone Hot Spot. Settings > Wi-Fi > “Wi-Fi – ON”.
Note that “Allow Others to Join” is turned on – this is NOT the default – make sure it is turned on. When you’re configuring ClearNode with the requisite credentials – above see “1 Choose ‘MyiPhone’ – the name in quotes is the Name/SSID you must configure. Also see “Wi-Fi Password” under “Allow Others to Join” – this is the Password/PSK you must configure.
Also note the setting “Maximize Compatibility” – which above is turned on. This setting determines if your hotspot advertises on the 2.4 Ghz WiFi network – if you have a version of ClearNode that has the Raspberry Pi 3B (versus the 3B+), or you have the ClearZero, you MUST turn this setting on or your ClearNode will not see your iPhone Personal Hotspot and cannot connect to it.
IMPORTANT: Your ClearNode can only discover and connect to your iPhone hotspot when your iPhone is unlocked and displaying the above page – don’t let your iPhone go to sleep or your ClearNode will not be able to start up it’s connection to the hotspot.
BEWARE THE APOSTROPHE IN THE SSID ! The default naming convention for new iPhone installations is to use names like “Gerry’s iPhone” – that device name also becomes the personal hotspot SSID. The devil is in the details – that apostrophe is not a standard ASCII character – it is an Unicode Special Character – look closely and you will see that it is slightly canted to the right. The low level WiFi configuration scripts in ClearNode cannot interpret that character properly and will fail ! Remove it ! (Settings > General > About > Name)
One more thing to check – that your ClearNode mobile app has access to cellular data when you are away from your home or office WiFi – Settings > Cellular > (Scroll down to find ClearNode) > Turn On.
Managing Android Hotspot Connections
This applies to the later versions of Android, particularly on the Samsung Galaxy phones be sure to turn this setting on:
Settings > Connections > Data Usage > Data Saver … Turn OFF!
Settings > Connections > Data Usage > Data Saver > Apps That Can Always Use Data > ClearNode … Turn ON!