Introduction
We’ve provided DVSwitch Server, including MMDVM_Bridge and Analog_Bridge, from the DVSwitch Group in the ClearNode software distribution. We are currently supporting DMR, P25, System Fusion YFS Reflectors, FCS Rooms and NXDN Reflectors. You do not need a digital radio – you will use your Analog FM radio as normal (in fact, your node will not respond to your digital HT in digital mode). Your audio is transcoded over to the Digital Network via the Analog and MMDVM bridges.
(For Issues connecting to Brandmeister Talk Groups eg. TG91 Worldwide – please see the notes at the end of this page.)
(For notes on using DSTAR please go here.)
Before you can operate on the Digital Networks
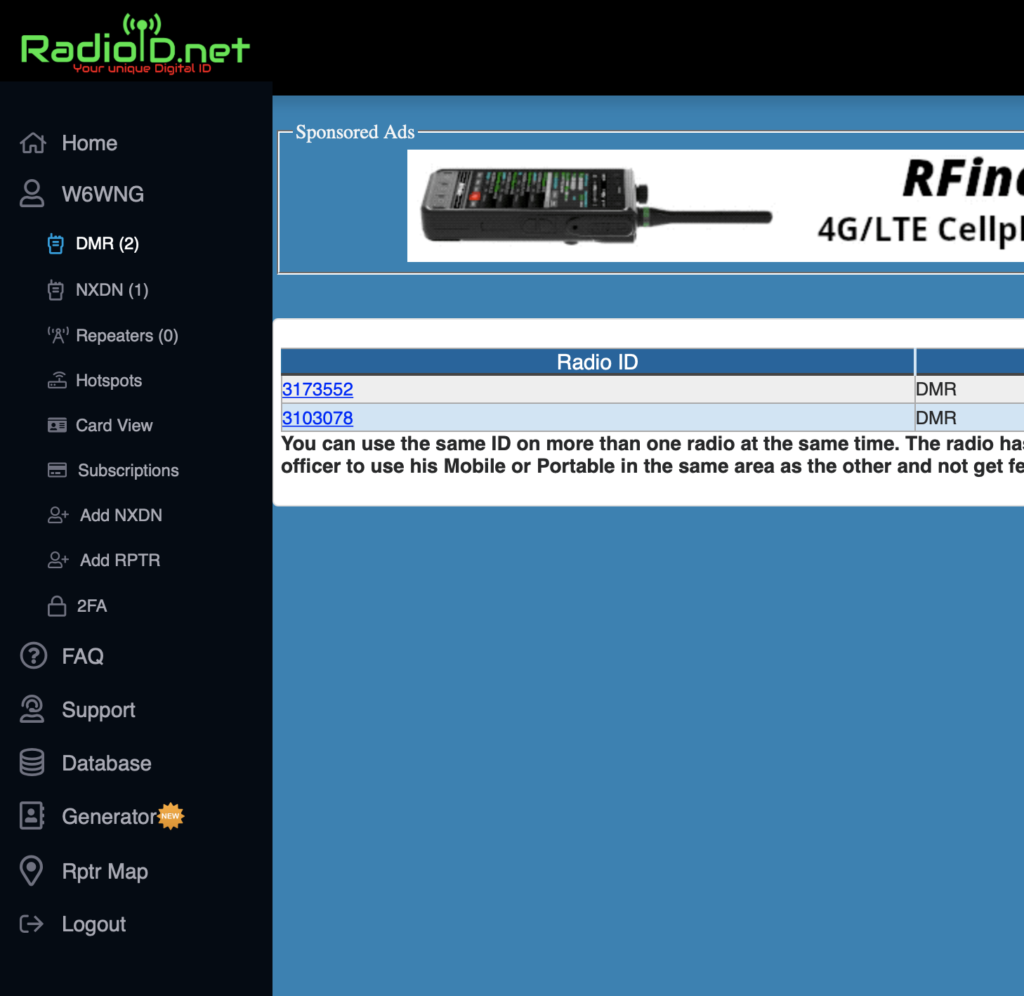
You must apply for your Digital ID (aka DMR ID) at https://www.radioid.net/ and you will need to register for an account at https://brandmeister.network and/or http://tgif.network (if you are going to use their Prime service).
If you are going to use the NXDN mode you must also apply for an NXDN ID at https://www.radioid.net – this is a separate id from your DMR ID – it is usually 4 or 5 numbers. There will be an exchange of confirmation emails as you work through this process
After completing your ID applications you may need to wait 24 hours for those IDs to be updated in the various lookup databases.
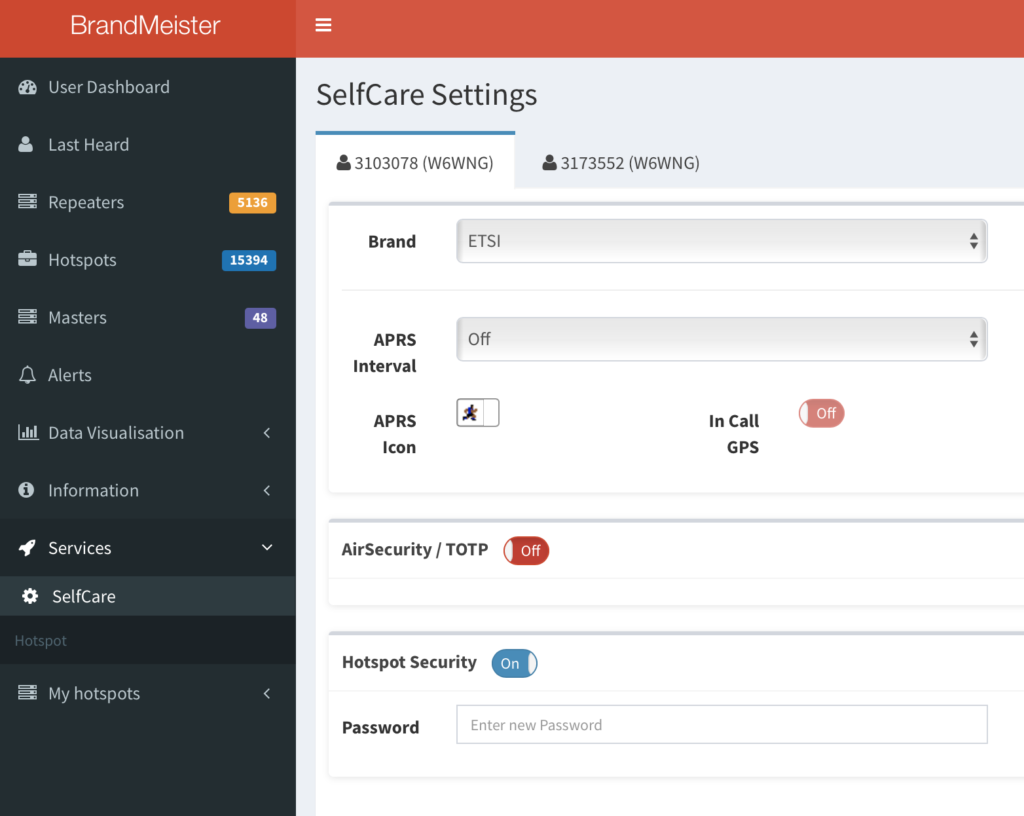
After you have logged into the Brandmeister website – go to the SelfCare Page, turn on “Hotspot Security” and type in a password of your choice and “Save” the page. You will need this password for your Digital Bridge setup in the ClearNode mobile app.
Here’s the offical BM instructions for the process: https://news.brandmeister.network/configure-a-security-password-for-your-hotspots/
As of writing you do not need to register with http://tgif.network – they are not authenticating user connections. We understand that this is changing and they will be requiring secure connections in the near future. Use the default password instead of your custom hotspot password for now.
Configuring your ClearNode for the Digital Modes
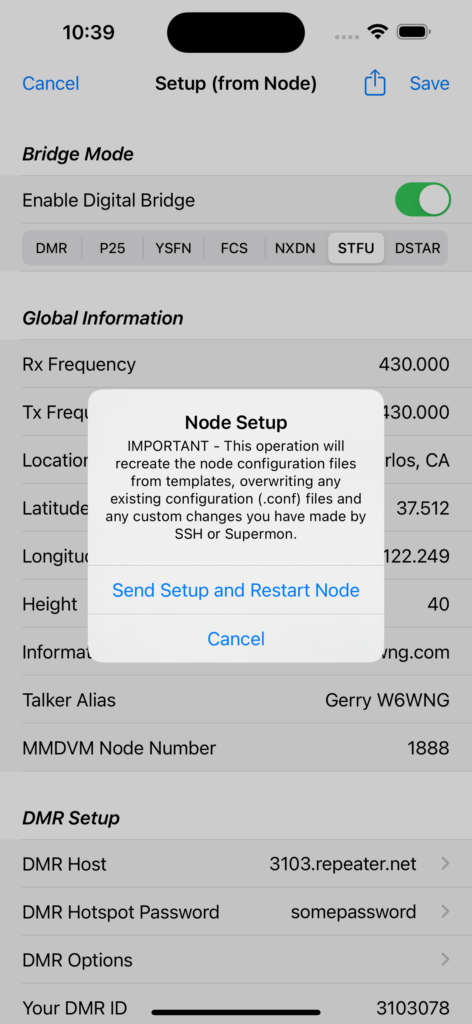
At the bottom of the Node Details screen tap on “Digital Bridge Setup” and turn on “Enable Digital Bridge” to enable the relevant services to start up at boot.
Configuring your personal DMR, NXDN and Hotspot IDs
Now that you have acquired these unique IDs for your call sign they need to be set in your Digital Mode Setup. Your DMR ID should go in the DMR Setup Section in “Your DMR ID”, and your NXDN ID should go in the NXDN Setup Section in “NXDN ID”. Be sure to tap the Save icon in the top right corner of the screen and wait for your node to reboot. “This hotspot extension # (2 digit)” should be configured with some number between 01 and 99 that does not clash with any other digital hotspot you might have running.


Configuring the Global Information Section
Fill in the fields “Location”, “Latitude”, “Longitude”, “Information URL” and “Talker Alias” with something appropriate – these text values are presented in various places throughout the different networks. It is typical to include your name and call sign in the “Talker Alias” field. Your DMR ID and hotspot extension are used for all for Digital Modes (except NXDN) – we’ve included it in the DMR section since that is what it was originally called. Please do fill out the Lat/Long values with something sensible. If everyone were to leave these values at 0.000/0.000 the various maps that different systems provide are disrupted.
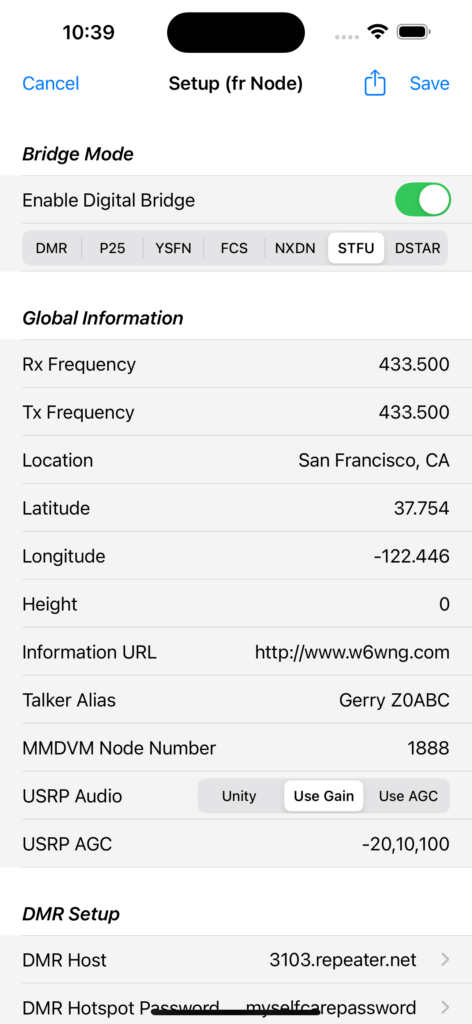
MMDVM Node Number: is set to 1999 by default, and this is the default most installations use, including devices other than ClearNodes. This can be a problem if multiple people connect to the same AllStar Hub, all of whom have DVSwitch enabled and are using this default pseudo node #. The AllStar Hub will see this as multiple duplicate node numbers trying to connect since ALL node #s are aggregated at the hub. The duplicates will be disconnected. Randomize this number between 1000 and 1999 to avoid this issue. The actual value of the MMDVM Node Number is not important so long as it does not clash with anyone else’s use.
USRP Audio/USRP AGC: Use these settings to enable some level of Automatic Gain Control on the audio received from AllStar that is being transcoded to the Digital Mode in use.
USRP Gain / TLV Gain: control the gain or cut applied to the audio encoding sent between AllStar and Analog_Bridge in the case of USRP and, between Analog_Bridge and MMDVM_Bridge in the case of TLV. The value 1 (one) is equivalent to no gain or cut. In effect USRP gain effects the gain of the incoming audio from the digital network that you hear on your HT, and TLV effects the gain on your audio going to the digital network from your HT. There are separate gain levels for each of the five modes – digital bridge interactions will be reset to the appropriate value after you select the mode and reboot your node. We have tested ClearNode in the five separate modes and the default values provided are a very good place to start.
You can preview your audio settings by tapping the action menu in the top right corner of the screen and tapping “Preview Digital Audio Gain”.
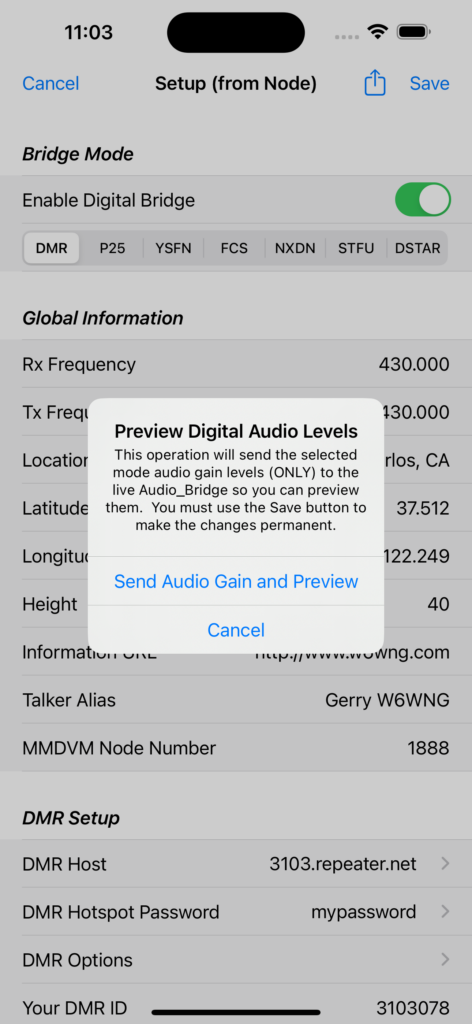
Once you’ve set the value and requested the preview, use one of the many Echo or Parrot nodes to test. Note that this is a preview mode only – you must still tap “Save” in the top right corner of the screen to make those changes permanent.
Choosing and configuring a DMR Network
The second block of setup values “DMR Setup” is where you select your DMR network of choice. “DMR Network Host” reveals a selection table where you can record the details and passwords for other networks. We include 2 networks for convenience – however they do have to be individually configured with your Hotspot Security Password. Tap on the relevant network host to transition to a screen where you can set your password.

In particular you must configure your password for the Brandmeister network – here we are connecting to “3103.repeater.net”. The Port can be left at the default of 62031 for most all cases. It is provided to support private servers that might have been implemented differently.

After entering the host name and password, tap “Save” in the top right corner to return to the Digital Setup screen.
You can leave “DMR Timeslot” and “DMR Color Code” at the defaults unless you fully understand their purpose and have reason to change them.
At this point you can tap “Save” at the top right corner of the Setup Screen to send the configuration to your ClearNode. Your ClearNode will reboot as it sets up the digital mode services.
Connecting to DMR Talk Groups
After ClearNode reboots let it settle for a couple of minutes to be sure authentication has completed. You are now ready to start connecting to Talk Groups. We will use the Brandmeister Talk Groups in this example. Once your ClearNode is back up and running and you are on the Node Detail screen, tap on the “Add Connection” button to activate the remote node catalog/history screen. Tap the digital icon at the bottom of the screen to chose Talk Groups already in your catalog.
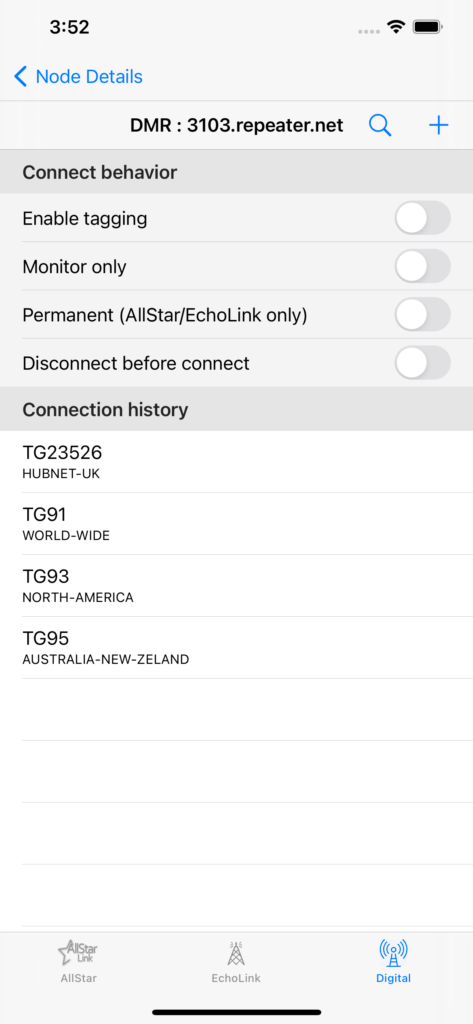
The catalog for Digital is subdivided according to the DMR Network Host you selected in the Digital Setup section. Only the Talk Groups appropriate for your selected network will be displayed in the table. You may manually enter a new Talk Group by tapping the “+” icon in the top right corner.
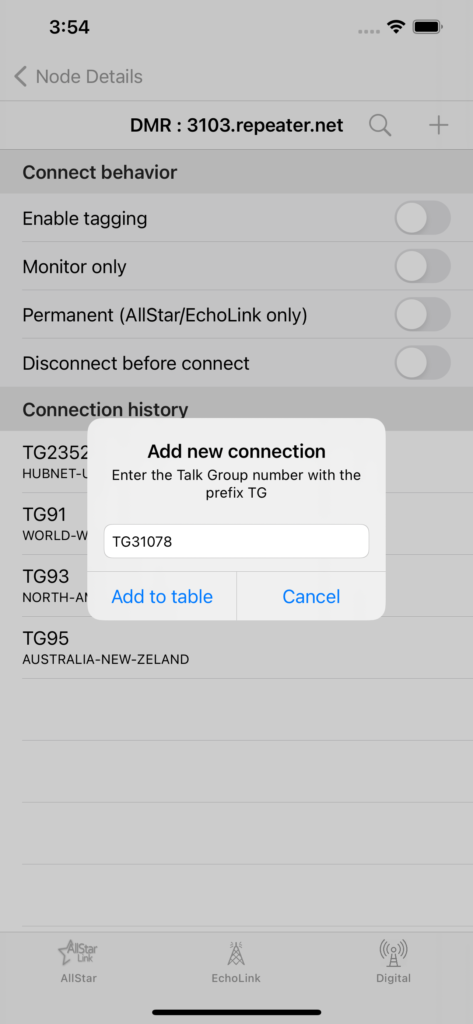
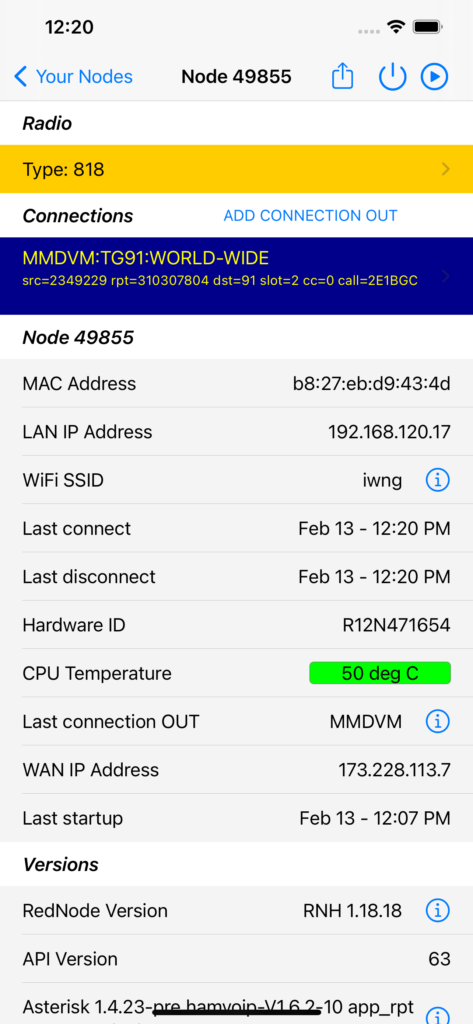
Note that for Digital Talk Groups you begin the number with the prefix “TG”. After adding to the table you will be returned to the Node Details screen if the Talk Group is found and connects.
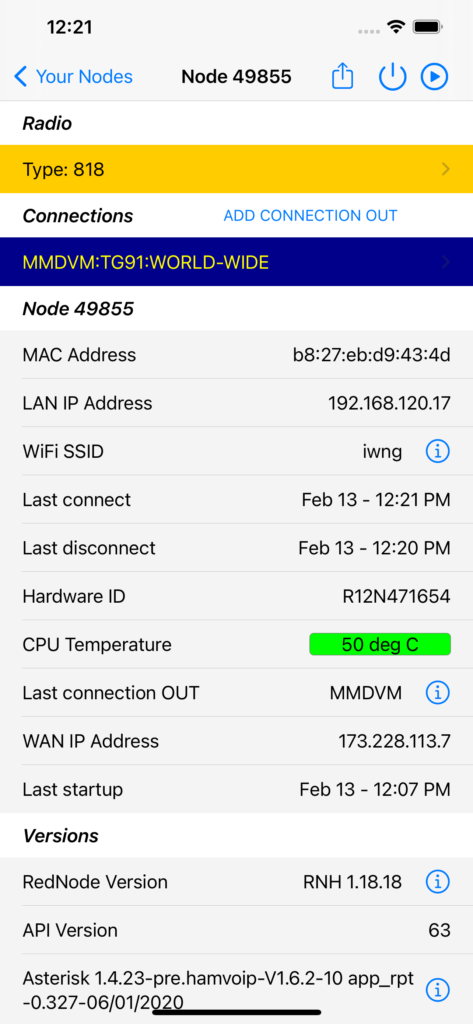
Initially the connection will be displayed as above. After a short period the “Talker” will be displayed in the sub-title of the Connection row. If no traffic arrives from the network you may need to “stick” the connection by “kerchunking” once (tap and release the PTT on your HT to send traffic to the Talk Group). In some systems “kerchunking” is thought to be impolite so don’t do it multiple times, better still just announce your callsign on the network once.
The “ADD CONNECTION” process for Digital Modes is a little different from AllStar and Echolink. In the non-digital modes you can add multiple connections inbound and outbound and they are all bridged together. Whereas the digital mode is bridged to any other non-digital connection, you can only have one digital connection at a time.
You may also search for digital connections – from the “Add Connection” screen tap the spyglass search icon in the top right corner.
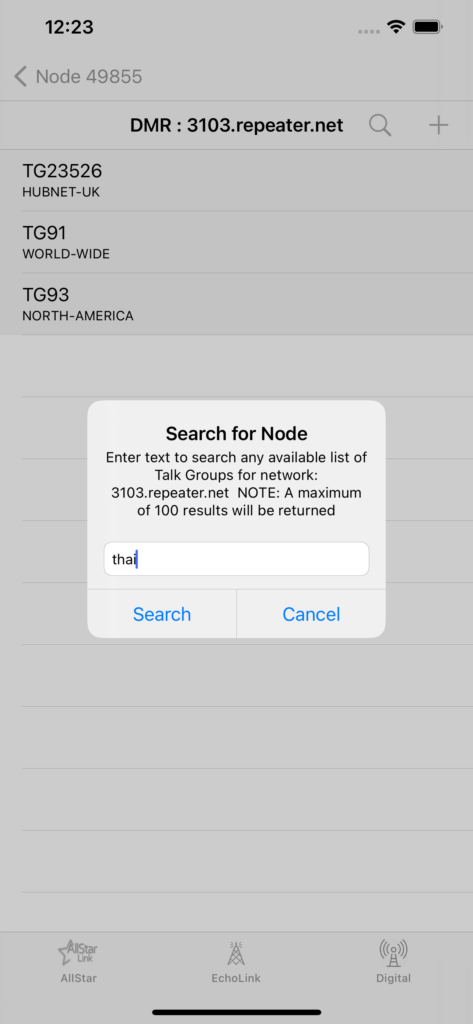
We maintain a table of Talk Groups, Reflectors and Rooms on our servers which we update periodically – this is the table that is searched – a maximum of 100 results will be returned.
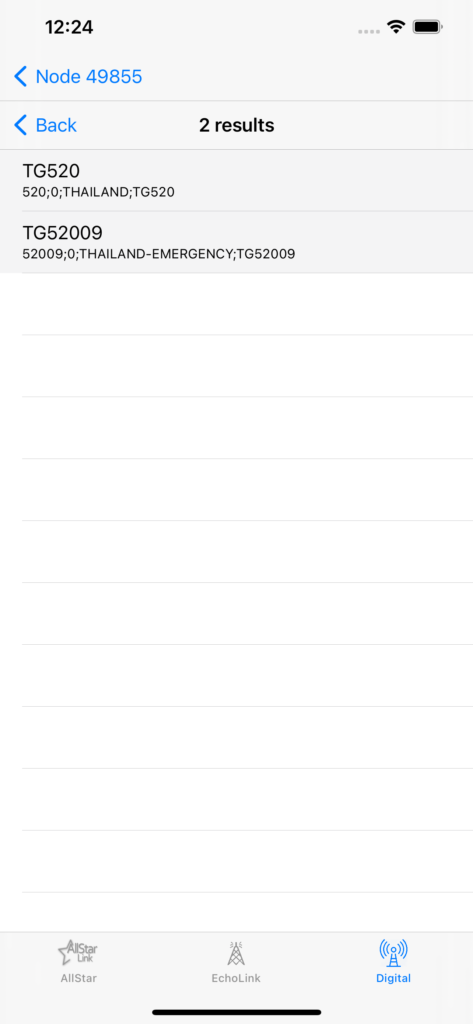
Tap on any of the results to add this Talk Group to your personal catalog, connect to it and return to the Node Details screen.
To disconnect from the Talk Group use the same gesture as you do for AllStar and Echolink connections – swipe left in Apple iOS and long press in Android.
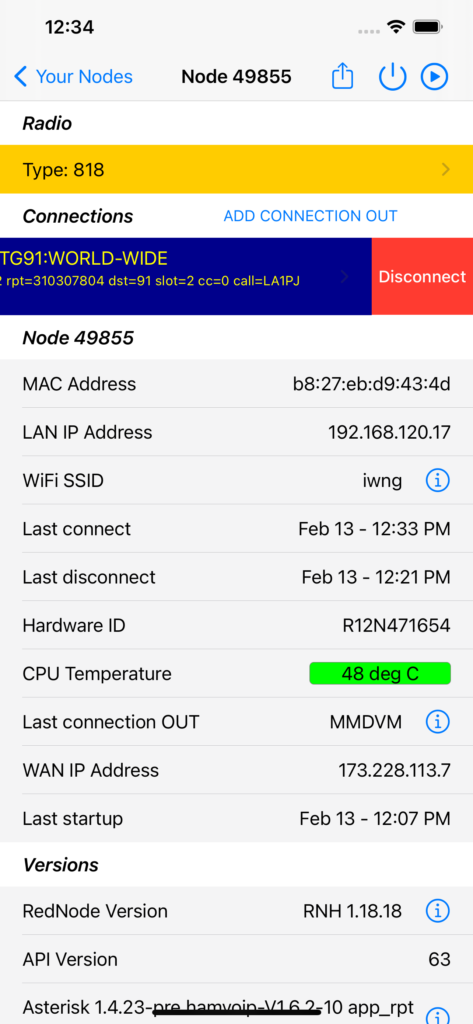
Although in other implementations Adding Talk Groups is cumulative – not so in ClearNode, before issuing the “Tune” command for a new Talk Group, ClearNode will issue a “Disconnect” command to clear all existing connections. This acts as a fail safe to prevent cross connecting Talk Groups.
P25, YSFN, FCS & NXDN modes
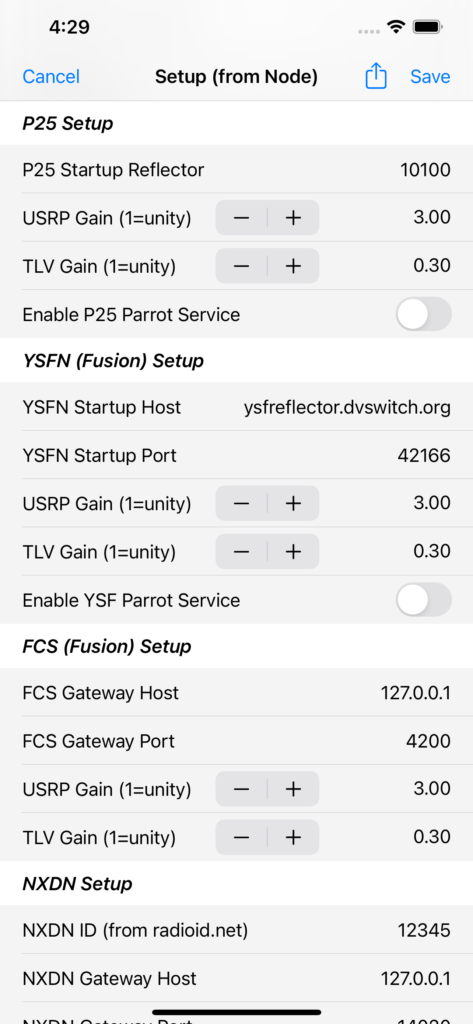
For these modes there are less options to configure – as noted above the USRP and TLV gain levels have sensible defaults.
Let’s discuss the operation of each of the last 3 modes separately and explain the setup parameters.
P25 aka “Project 25” is the open Amateur Radio version of the network protocol that has since become encrypted and is often used by Emergency and First Responders in their radio systems. The “P25 Startup Reflector” is the first reflector you will be connected to when you select this mode – you can change the current reflector in the ADD CONNECTION screen just as you would change DMR Talk Groups.
YSFN aka “Yaesu System Fusion Narrow” allows connection to a network of Reflectors similar in fashion to the P25 network but using C4FM protocol. The “YSFN Startup Host/Port” is the public network address of the first reflector you will be connected to on startup. Be sure to have this populated as in the image, or you won’t be able to change reflectors. Change reflectors in the ADD CONNECTION screen just as you would DMR Talk Groups.
FCS is network of hosts and Rooms something akin to Wires-X rooms. Since Wires-X is a protocol proprietary to Yaesu and can only run on Yaesu hardware, the FCS network provides and alternative that often bridges FCS to the corresponding Wires-X room. Note that the “FCS Gateway Host/Port” is pointed to “127.0.0.1” i.e. the internal “localhost” address of your ClearNode. Connections to the FCS network are implemented via a software service “YSFGateway” which is now installed on your ClearNode. MMDVM_Bridge forwards and retrieves audio packets to the YSFGateway which controls the actual connection to the FCS network. We provide the “FCS Gateway Host/Port” details for the rare occasions when you might want to configure use of YSFGateway that is not on your ClearNode. In general this is not necessary so do not change these values. Change FCS Rooms in the ADD CONNECTION screen just as you would DMR Talk Groups.
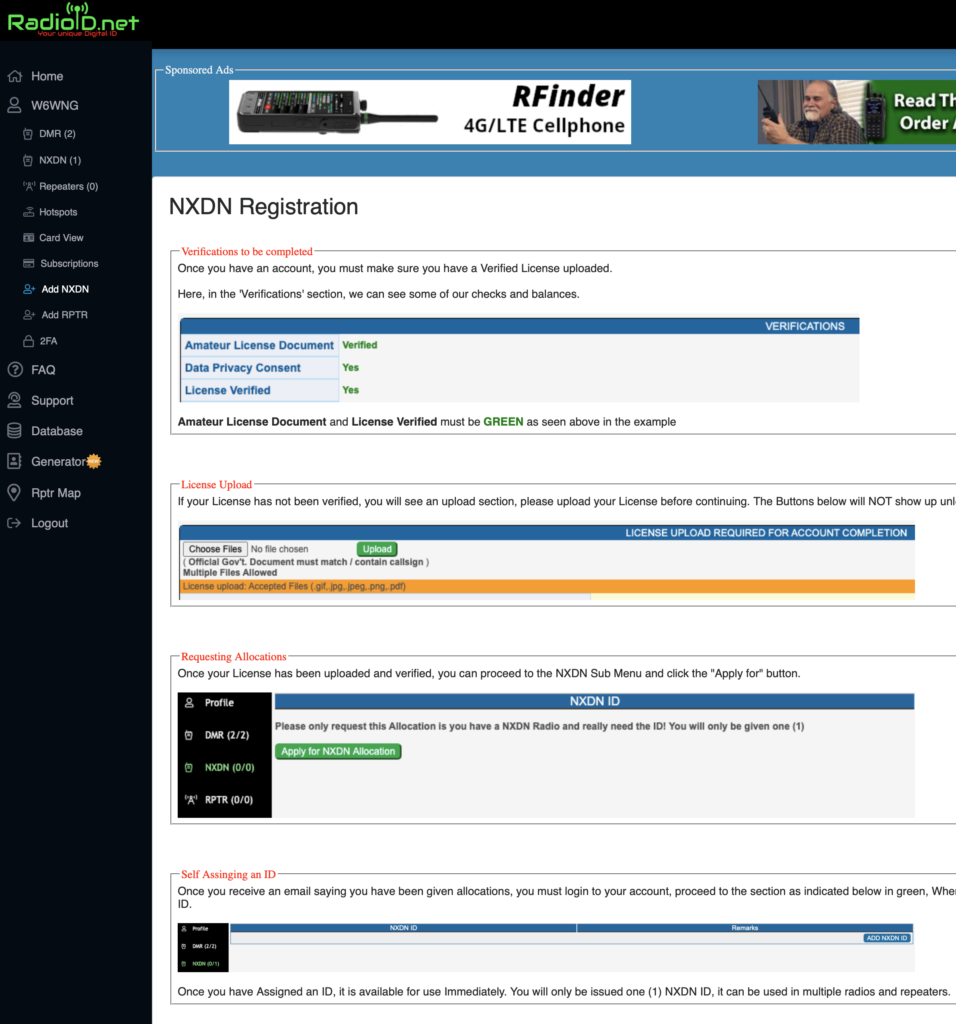
NXDN (Next Generation Digital Narrowband) is a network of reflectors using the NXDN protocol which was developed jointly by ICOM and Kenwood. To operate on this network you must apply for and be granted your NXDN ID – you must also enter that ID into the NXDN Setup section of the Digital Bridge setup. This is NOT the same as your DMR ID. However, you do apply for it at the same place https://www.radioid.net. Below is a snapshot of the web page where you apply for your NXDN ID.
Connections to the NXDN network are implemented via a software service “NXDNGateway” which is now installed on your ClearNode. MMDVM_Bridge forwards and retrieves audio packets to the NXDNGateway which controls the actual connection to the NXDN network. We provide the “NXDN Gateway Host/Port” details for the rare occasions when you might want to configure use of an NXDNGateway that is not on your ClearNode. In general this is not necessary so do not change these values.
Parrot Services
Included in your ClearNode DVSwitch software are 3 parrot services that allow you test your installation. The parrot services are specific to the P25, YSFN and NXDN modes (FCS shares the parrot service with YSFN). Normally these services are not enabled unless you turn them on in the Digital Bridge setup. If you wish to use them you must enable them in your setup and save the setup to your ClearNode. Even if you enable all 3, only the one relevant to the AMBE Mode you have chosen will be started. Keep these services disabled if you are not actively using them – this will save resources on your ClearNode.
Keeping the Host and ID files up to date
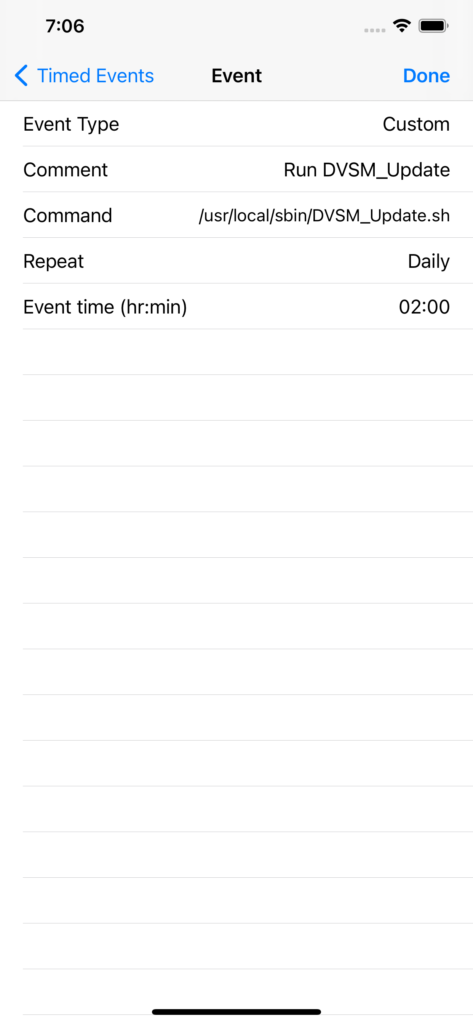
There are several lookup files where the DVSwitch services lookup the names and identities of all the hosts and endpoints on the digital networks. These files need to be kept up to date as they change. (These lookup files are located in the /var/lib/mmdvm and /var/lib/dvswitch directories on your ClearNode.) A script is provided to update these files – /usr/local/sbin/DVSM_Update.sh You may run this script manually at the ClearNode’s Raspberry Pi CLI, however it is much easier to automate it and run daily. Here is an image of a typical Timed Event setup to run this script automatically. (See the Timed Events documentation for more information on creating Timed Events.)
Troubleshooting
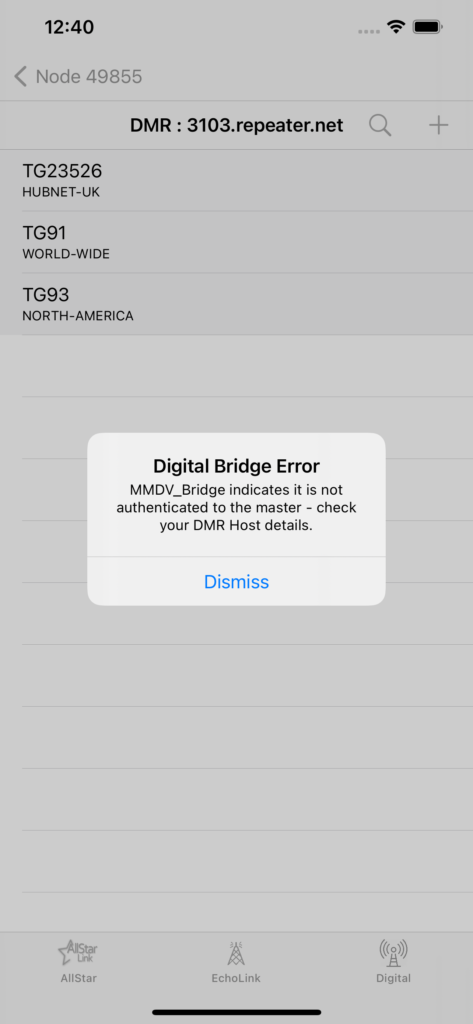
If you get the following dialog when navigating to the Digital section in the Add Connection screen with the messagge “MMDVM_Bridge indicates it is not authenticated”, check your DMR Network Host password – be sure it is identical to the value set in your hotspot security settings at Brandmeister or whichever system you are connecting to. Also check the correct spelling of the host name and that you have the correct port for the host.
If after connecting to a system you find that you get no traffic when you are certain there is traffic on a Talk Group as evidenced by the “Last Heard” page or some such, “kerchunk” the system by briefly depressing the PTT on your HT to send traffic to the Talk Group. This is not supposed to be necessary, but we have noticed that in many cases it is. Be respectful, don’t “kerchunk” repeatedly, you are liable to get blocked by the Talk Group Administrator – better still, just announce your callsign.
Like AllStar and Echolink – DMR systems and individual Talk Groups may operate Black and White Lists to Deny and Allow individual connections. They may also block individual nodes using an IP Address block. If you suspect that you have been blocked contact the target system’s technical support for help.
We’ve also heard that some Talk Group Administrators don’t look favorably on nodes that use “Bridging” and may seek to block access. Again a polite inquiry with the Administrator may help.
Note that the “Parrot” DMR Talk Group TG9990 on Brandmeister is a “private” connection – you must add a “#” at the end e.g. “TG9990#”.
Issues with connecting to certain Brandmeister TGs
Since about the beginning of 2023 DVSwitch Users have not been able to use a subset of the Brandmeister Talk Groups using the DMR mode. DVSwitch is the Digital Bridge software used by ClearNode. DVSwitch has implemented an alternate mode for accessing Brandmeister TGs – it is called STFU – since API Level 99, this new mode has been available in ClearNode.
If you are using Brandmeister hosts, in Digital Bridge Setup select STFU in favor of DMR.

Note: This is for Brandmeister ONLY. Continue to use the DMR mode for TGIF etc.
If you’re curious what led to this situation – take a look at Brandmeister’s brdiging policies: https://help.brandmeister.us/bridges/bridging-to-brandmeister. Keep in mind DVSwitch is a bridge between the Digital and Analog modes.