EchoLink has some deployment details outside of just configuring your ClearNode’s EchoLink screen. EchoLink will not work if these details are not attended to. Here we lay out exactly what is needed to get EchoLink working on your ClearNode, ClearRPT or ClearRLS.
Let’s start with some important things to keep in mind (replace Z0ABC with your call sign):
- The EchoLink organization REQUIRES that we use Sysop mode on our ClearNodes – that simply means that when you enter the call sign in your EchoLink configuration it MUST be either Z0ABC-L or Z0ABC-R – you CANNOT use Z0ABC. ClearNode will not allow you to configure the non-Sysop mode.
- You can only have ONE instance of EchoLink running on your local network, i.e. behind a single WAN IP address. If you have EchoLink running on your Smartphone and it is connected to the same WiFi as your ClearNode – it will disable the EchoLink on your ClearNode. You cannot use your Smartphone to test your ClearNode EchoLink in that way. Similarly you cannot run both -L and -R on two separate devices on your local network.
- You MUST implement UDP Port Forwarding for port 5198 and 5199 through your WiFi/Router to the IP Address of your ClearNode. It will NOT function without it. (There are some routers out there that will generate a dynamic forward when they detect usage on those ports – but at some point it will timeout when there’s no traffic – one minute it’s working and the next minute it’s not – you MUST implement it explicitly with a port forwarding rule.) You do NOT need to forward port 5200 and do NOT set it up as a TCP or UDP/TCP rule – set it to UDP only.
- Since EchoLink requires port forwarding, as a rule of thumb, you will not be able to use it when your ClearNode is connected to the Internet via a Cellular Hot Spot. In general such hot spots do not allow port forwarding. This can be the case with Satellite based internet services as well – depending on what service level you are paying for. There are advanced methods you can employ such as VPN services, but that is not within the scope of the Support we provide.
Step 1 – Port Forwarding
As detailed above you MUST implement the port forwarding first – nothing else will work if this is not done first. Forward UDP ports 5198 and 5199 to the IP Address of your ClearNode. You may want to set up a static DHCP lease for you ClearNode’s MAC Address to prevent its IP Address changing if the node is powered down for some time, thus invalidating the forwarding rule.
If “Port Forwarding” is a mystery to you – you may find this video helpful – it’s more of a general primer – but it applies none-the-less.
Step 2 – Configure EchoLink in your ClearNode
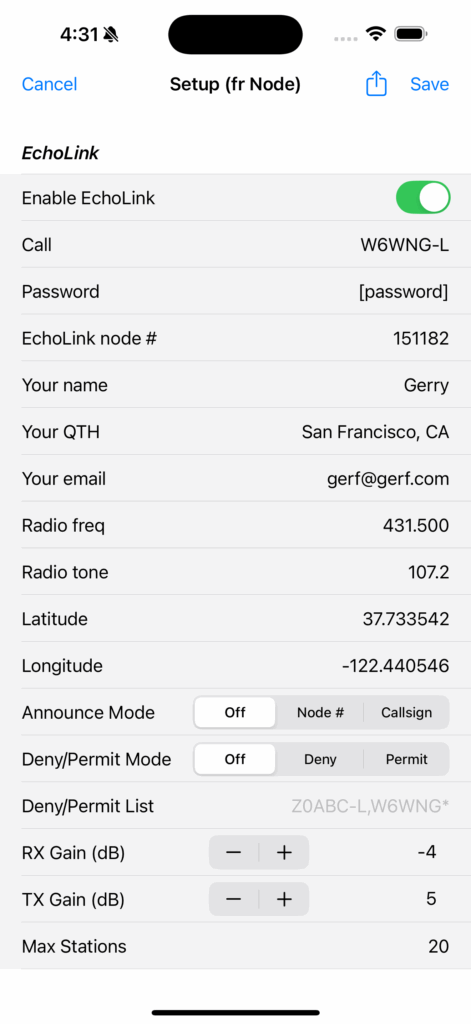
See the example below – you may use a dummy “EchoLink node #”, e.g. 123456, since it will not be assigned until your version of your Sysop call sign is validated at EchoLink. In the last step you will come back to this screen to enter and Save the node #.

When you’re done tap Save in the top right corner and wait for your node to reboot. If you’ve setup the port forwarding correctly your node will try to connect to EchoLink and log in. At this stage it will still not work because the new login with the Sysop call sign will trigger a workflow at EchoLink – Validation.
Step 3 – Validation
In your web browser on whatever device you’re using navigate to this link – enter your callsign and follow the instructions.

If your port forwarding is missing or incorrectly configured, the process will fail here and you will get error messages from the validation process. You must fix any port forwarding issues before you can continue.
If you get confirmation from this page that all is well, you can proceed to the next step.
Step 4 – EchoLink Node #
Go to this link to discover the correct node # for your version of the Sysop call sign.

Note: This has nothing to do with your AllStar Node Number – this is quite separate. Enter the number in your EchoLink setup in the ClearNode Smartphone App and save it to your node.
That’s it you are done ! Try connecting to 3009999 which is the EchoLink parrot service – you should hear a welcome announcement as soon as you connect – try transmitting your voice and listening to it being repeated back to you.