Introducing our latest product – a radio-less ClearNode – the ClearRLS.
A rechargeable, battery powered AllStar/EchoLink/Digital node with a built in speaker, microphone and PTT.
ClearRLS has a compact physical form that fits in the hand or stands upright on your desk. On the front panel is the Speaker, Microphone and a PTT button. On the left panel is an up/down rocker switch that controls speaker volume through software. On the right panel are 3 Micro-USD ports, a 3.5 mm speaker/headphone jack and a “soft button” (momentary on/off button) that can be user programmed to start specific connections and disconnections. In the bottom panel are the recessed on/off slider switch and USB-C charging port.
ClearRLS Features:
- Rechargeable battery powered (5,000 mAh – good for 6-8 hours)
- Built in high quality Magnetic speaker with an audio range from 200 hz to 10 kHz
- Built in Electret Condenser Microphone with 3 levels of amplification (handheld/low, desktop/mid, room/hi)
- 3.5 mm audio jack for external speaker, headphone or earpiece (select Stereo/Mono via jumper)
- PTT momentary switch
- Toggle PTT on/off via ClearNode mobile app
- Up/Dn rocker switch to control speaker/headphone volume
- On PCB trimmer potentiometer to fine tune audio out volume for headphones
- 3 Micro-USB ports – (for keyboard, ethernet network adapter, etc)
- Momentary “soft” push button – user programmable – 1 to 3 taps for 3 separate user definable connect functions
- HDMI monitor side jack access
- SD Cards access at the base
- LED indicators – Heartbeat (green), Signal (red), Traffic (orange), PTT (blue), charging status (amber)
- Raspberry Pi 3A based for low power consumption
- All of the typical functionality of the common ClearNode Mobile app – Timed Events, Notifications, AllStar/EchoLink/Digital configuration
ClearRLS Use Cases:
- All-in-one handheld access node – access all your favorite AllStar, EchoLink and Digital destinations without the need for an HT. Superior audio quality. Full-duplex (when using headphone for received audio), Push To Talk
- Desktop (full-duplex when using headset or earpiece) node to node connection with PTT toggled ON
- Round-table discussion monitor streamed to remote node, hub or reflector with PTT toggled ON
- Room monitor – Mic Gain set to High, PTT toggled ON
Case/Enclosure options
The base product, as depicted here, sports a rugged 3D Printed case that is translucent so you can view the LED indications on the top and bottom of the node.
A transparent case alternative is in development. Once it’s available it will be offered as an upgrade option on new nodes purchased once it’s available. For devices bought as base product, the new case option will be offered as a separate purchase for factory replacement or shipped parts for self assembly.
Customers who purchased the Beta product will be eligible to choose a new case option free of charge – you can return your ClearRLS for case exchange, or we can send you the parts for self assembly.
ClearNode Mobile App screens
From the “Node Details” screen tap on “Type: RedRLS – Tap to configure”
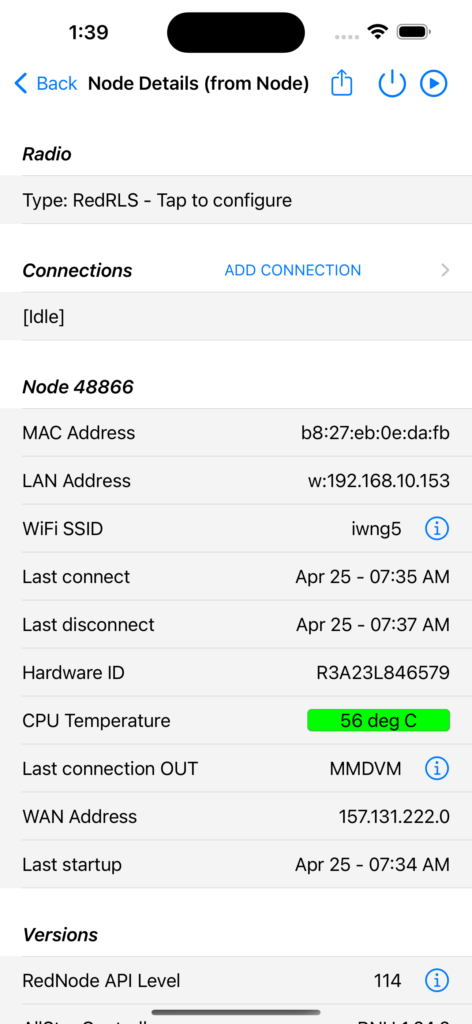
The “RLS Control” screen allows you to toggle the PTT – “MIC ON (Send to network)” so your node can provide a continuous stream of audio received at the built in microphone. “MIC Gain” controls the amplification of what’s received at the microphone – LOW for normal handheld use, MID for desktop use and HIGH to monitor a room.
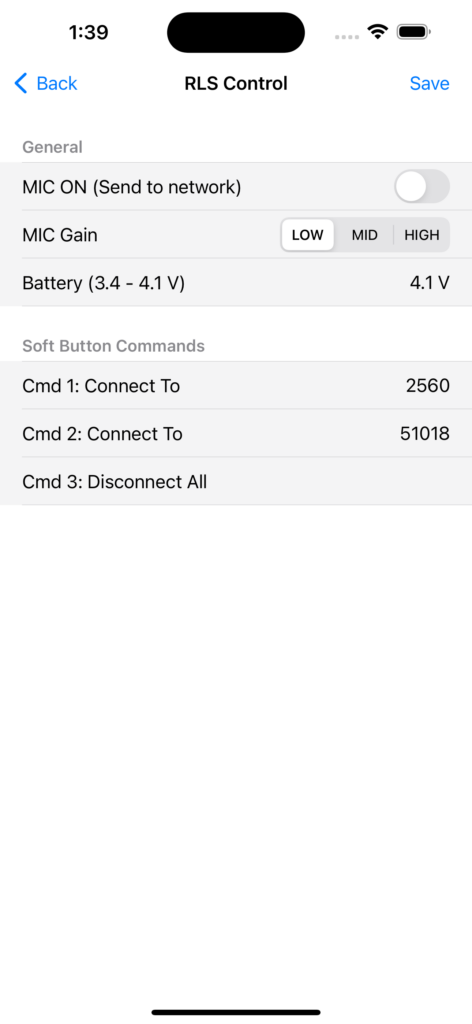
“Battery (3.4 – 4.1 V)” presents the current voltage at the battery terminals. When the charging cable is removed, anything less than 3.4 V will initiate a low battery notification and will eventually shut down the node’s operating system. Once you get the notification you should re-apply power to the charging port next to the power sliding switch.
With the charging cable connected, a voltage of 4.1 indicates that the battery is fully charged. Once fully charged, with the power switch on (slide towards the charging port), the Amber LED will begin to flicker. If the power switch is off (slide away from the charging port), eventually the Amber LED will go out.
Soft Button Commands
On the right had side of ClearRLS is a small, white momentary push button. This “soft button” can be configured to execute connect and disconnect commands. Each press of the button is counted. On the first press a 4 second time is started. At the end of the 4 seconds the node will execute the command corresponding to the number of times the soft button was pressed before the 4 seconds expired.
On the “RLS Control” screen, tap on any of the “Cmd 1” through “Cmd 3” rows to configure the command.
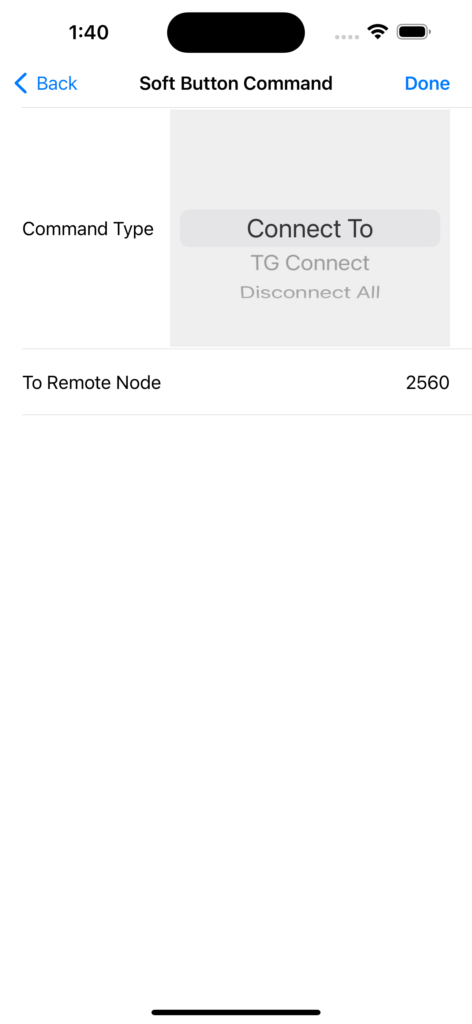
Once you are done configuring the commands you must return to the “RLS Control” screen and tap “Save” to send the new configuration to the node.
Audio Settings
Speaker/Headphone volume is controlled in several ways.
When ClearRLS starts up it sets the volume to the default value as set in Node Details > Adjust USB Audio Gain for VOIP > “From VOIP (txmixaset)”.
When in use you can adjust the volume using the rocker switch on the left side of the node – rock up to increase volume and rock down to lower. The volume control increments or decrements the live value for “From VOIP (txmixaset)” in the USB Audio. On startup volume is reset to the default value in the USB Audio settings.
When using headphones plugged into the 3.5 mm stereo jack on the right side of the node, the above 2 methods might not provide enough adjustment, particularly at the lower end. You can adjust the gain of the speaker amplifier circuit by rotating the trimmer pot on the PCB – there is an access hole in the lower right portion of the face plate – you will need a small flat “watchmaker’s” screwdriver.
Stereo and mono headphones – if your headphones have a stereo 3.5 mm plug you will need the stereo jumper in place – in the lower right section of the right side access slot. If you have a mono 3.5 mm plug on your headphones, you MUST remove the jumper or you will hear nothing. Your ClearRLS is shipped with this jumper in place, we assume you will use stereo headphones.
If you find that the speaker or headphone output to be a little too “basey” or overly “full” for your taste, try turning on Node Details > Adjust USB Audio Gain for VOIP > “Enable Pre-Emphasis”, then save and reboot.
Microphone gain.
As indicated above in the ClearNode app screens – you can control microphone amplification using the
“RLS Control” screen. You can set the gain to LOW, MID and HIGH. When using ClearRLS in a similar way to your HT – set the gain to LOW and hold the node 3 to 4 inches away from your mouth when speaking.
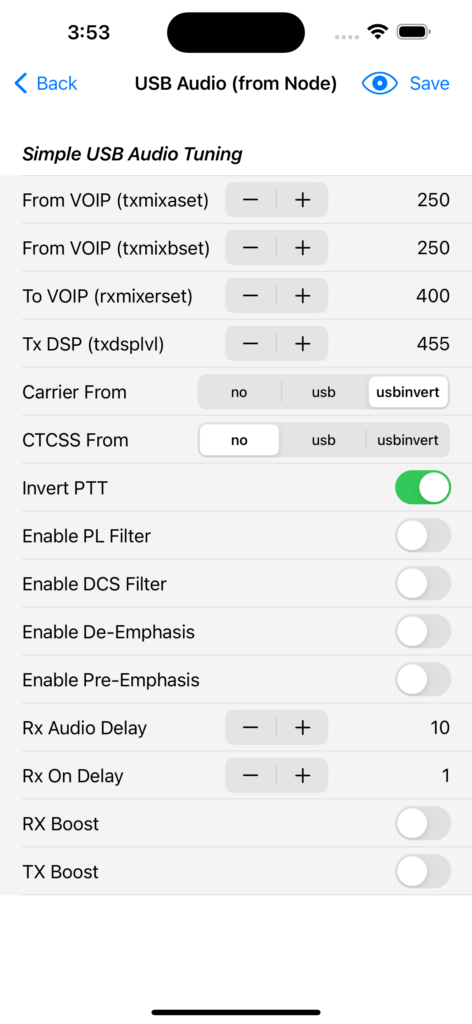
You can also fine tune the software gain in Node Details > Adjust USB Audio Gain for VOIP > “To VOIP (rxmixerset)”.
Here is an example of the typical USB Audio settings for ClearRLS.
Networking and WiFiByLight
ClearRLS has available USB ports to plug in an Ethernet Network adapter – we’ve tested this device with good success.
ClearRLS, like all our node products, supports the WiFiByLight process. The optical sensor is mounted on the top PCB – just below the volume control on the left, close to the edge of the node. If you aim your smartphone flashlight at the top of the volume control, 1/2 to 1 inch above, you’ll be fine
Troubleshooting
If on power up the Green LED (heartbeat) fails to light and start flashing, and you get no audio from the node, pull out the charging cable, and power cycle the node by sliding the power switch off and then back on again.