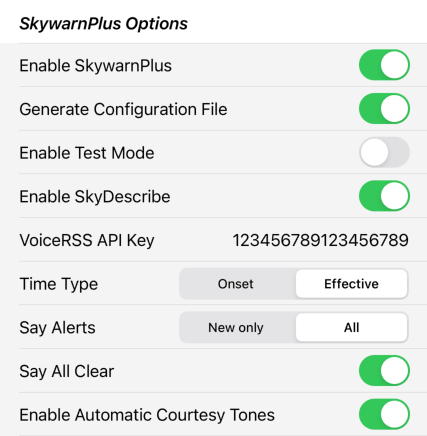
Category: Uncategorized

Did you know ? … Episode 3

(This is the third episode in a series of posts to help you discover all the functionality that you might not know exists in your ClearNode, ClearAlpha, ClearZero or ClearRPT. We’re going to publish an episode each Sunday evening – come back and join us each week !)

Timed Events – special cases

Just a quick recap – Timed Events are control actions that your node can take automatically at specific times of the Month, Week, Day or Hour.

Select “Manage Timed Events” on the bottom of the Node Details screen

You can specify things like “Connect to DoDropIn every Tuesday at 7 pm” (for The Absolute Tech Net)

That’s pretty straight forward, in the time picker you are picking a specific day of the week, hour and minute, and of course the node you want to connect to.

Imagine you generally keep your node connected to a particular hub all day every day – with their permission of course. But the hub controllers have to reboot that hub once in a while, or maybe when you’re not in attendance some miscreant uses your node interfere with the hub, and the hub controllers have to disconnect your node to put a stop to it. Now when you come back to your node you see it disconnected – has been for hours – that’s a tad annoying. There is a solution – again get permission before from the hub controllers before you deploy this.

You can have your node re-connect every so many minutes per hour – the miscreants usually lose interest if they’ve been intercepted and disconnected, you can get back to business once they’ve gone elsewhere.

Create a Connect type Timed Event and select “Hourly” for the Repeat type. Now scroll the Minute Picker down to the bottom – note there are several odd looking entries with a star, a slash and a number.

The number represents how many minutes between each connect attempt, starting at the top of the hour. So “*/20” means the connection will be attempted at 0, 20 and 40 minutes past the top of the hour. I’m sure you can figure out the other alternates for yourself. Handy way to refresh that connection if get’s dropped. In this case the longest you’ll be disconnected will be 20 minutes. If it’s already connected, the connect attempt will be ignored.

After a reboot

There may be an action you want performed shortly after the node boots up – every time it boots up. There is a special case for the “Repeat” type. Create a new Timed Event and scroll the “Repeat” all the way to the bottom.

Note that the “Event time” picker has been locked out and now says “After reboot”. You can pick any Event Type for this kind of “After reboot” entry, although some probably won’t be appropriate – Custom Shell Commands are going to be particularly useful for some of you Linux savvy folks.

These “After reboot” events don’t fire immediately after reboot – they are delayed by 30 seconds – that’s so you can be sure the node has completed it’s startup process, so you’re command isn’t calling some service that hasn’t started up yet.

FYI … in ClearNode Timed Events are implemented as “cron jobs” – you can list them at the Linux CLI using the command “crontab -l”. We constructed this “separation of concerns” so that in the future, if we implement ClearNode on a platform other than Linux that doesn’t support “crontab”, we’d have the option to create something that has a familiar look and feel.

And one last time … if you implement automated connections to big hubs – be careful not to cross connect and ALWAYS seek permission before you do so.

73 … Gerry.


Did you know ? … Episode 2

(This is the second episode in a series of posts to help you discover all the functionality that you might not know exists in your ClearNode, ClearAlpha, ClearZero or ClearRPT. We’re going to publish an episode each Sunday evening – come back and join us each week !)

Continuing on our mission to discover where the action is at, this week we are going to look at the Fleet Last Heard screen. Once again tap on the share menu icon top left of the Your Nodes screen.

Tap on “Fleet Last Heard” in the App Menu – initially you’ll get an empty list – this is a live view and nothing will be listed until a node in the fleet lifts off their HT’s PTT button.

Patience will reward you here – wait a while and the screen will start filling up with entries – the latest will be on the top.

Some things to note here. Only nodes that are connected to other nodes are listed here – if a node is disconnected but receiving on the node transceiver – it will not be listed. Also, “kerchunks” are ignored the transmission has be greater than zero seconds.

The 1st line of each entry tells you the call sign and node number that is receiving on its RF side and thus pushing audio onto the destination, i.e. nodes it’s linked to.

The 2nd line of each entry gives you the timestamp of the end of the transmission and the destination nodes the audio was sent to. If you tagged those destination nodes in your ADD CONNECTION screen, the tag will be displayed in favor of the standard AllStar Number. If the destination is a call sign – it’s likely to be an instance of DVSwitch mobile, Zoiper mobile or RepeaterPhone mobile.

73 … Gerry.


ClearNode Pi4 – back in stock !

Our supply of Pi 4Bs has landed !

It’s going to be a busy few weeks – we’re expecting to get the first units out around Monday June 5th.

Given that the supply of Pi4s is healthy, but not unlimited, it seems fair to let people reserve their slot in the production cycle.

Version 2 of ClearRPT is nearing completion – still some testing to do and we need to finalize the case design. We’ll open Pre-Orders for ClearRPT in the coming weeks.

Onwards and upwards !

73 … Gerry.


Did you know ? … Episode 1

(This is the first episode in a series of posts to help you discover all the functionality that you might not know exists in your ClearNode, ClearAlpha, ClearZero or ClearRPT. We’re going to publish an episode each Sunday evening – come back and join us each week !)

AllStar, EchoLink and the Digital Modes can be a bit overwhelming for the uninitiated … or should I say a little UNDERwhelming ! You’ve gone to all the trouble to understand how all this works, you’ve got it all configured … and now what … where do you go ?

Discovering where the “action is at” can be discouraging to the point some folks give up and go play with a different toy. That’s a shame because there is a whole lot of action out there – it’s a question of where and when !

We’ve deployed a couple tools in the ClearNode system to help you along the path of discovery. In this episode we are going to look at the live connection and disconnection activity monitor.

Fleet connection activity

On the “Your Nodes” screen tap on the “Share” icon in the top left corner to bring up the App Menu

Tap on the “Fleet connection activity” option to bring up a screen that looks across the ClearNode fleet to see who’s connecting where.

You can see right away that there’s definitely some action on the Sierra Foothills system – lots of connects within the last 3 hrs. You can refine your search to a shorter or longer query period – 1 hr, 3 hrs, 24 hrs or 1 week – are you looking for what’s going on right now, or what goes on more generally ?

Let’s say you’re curious about the Sierra Foothills system – go ahead and tap on the Target Name – you will be offered the option to connect to that system right away. Your node “49855” will be connected to “51018” which is the actual node number for the Sierra Foothills system.

In this example the Target systems have real names “Sierra Foothills”, “The Talk Box”, etc. When you first start using your node these will be generic AllStar node numbers. As you get more familiar with your ClearNode you will start tagging those node numbers with names you can more easily recognize – we will cover that process in a later episode. Once you’ve tagged a node number that’s what will be presented here in favor of the generic node number.

Go ahead and give it a try !

73 … Gerry.


ClearNode 1.38 for iOS and Android, API 98 released …

What’s new in this release ?

  • You can disable Timed Events setup sequence checking via the main Settings screen “Check Setup Sequence”. It confused some folks that were using multiple app instances to configure their Timed Events. We still think it’s an important safeguard, so we counsel you keep it turned on.
  • “Auto Backup Node Config” has also been added to the main Settings screen and defaults to ON. This setting will automatically backup your node config to our servers every time you save it to the node. It’s wise to keep this turned on.
  • Removed the switch “Disable WiFi Networking” from the WiFi Management screen. Replaced it with a delete icon on the same screen in the top right corner. Some folks were confused by it’s purpose, having it as an explicit action is more intuitive.
  • When there is a new RedNode API version available, it will be displayed in the Versions section of the Node Details screen, eliminating the need to repeatedly download to check for the latest version.
  • Fixed a bug in the Android app where App Backup/Restore was failing
  • Fixed a bug where the embedded radio transceiver configuration was erroneously being overwritten and thus reporting incorrect values

73 … Gerry.


Announcing ClearAlpha !

ClearAlpha is a new product based on the Raspberry Pi 3A+

There are a lot of similarities with the ClearZero product which is no longer available. Compact form, very low power consumption – ClearAlpha is a great travel companion. No ethernet port nor available USB ports – so managing WiFi connections carefully is important.

Exact same software stack as the ClearNode – you can work AllStar, EchoLink, DMR, P25, YSF, FCS & NXDN.

A lower price ($295) makes this node a little more affordable.

73 … Gerry.


ClearNode 1.37 for iOS and Android, API 97 released …

Changes in this release

  • Added ctcssfrom and txboost to simpleusb.conf – these support our software subscriptions for non ClearNode devices that use external audio processors and radios
  • The AllStar Deny/Permit list now operates independently from the EchoLink Deny/Permit list
  • Rx On Delay’s lower bound is now -300 to better support Repeater interaction
  • Timed Events are now included in the mobile app backup/restore
  • When entering the node # in AllStar Setup, user is queried before the ClearNode app re-uses setup parameters previously memorized for that node #
  • “(from App)” or “(from Node)” is displayed in the title of the various setup screens to indicate wether values from the node, or from memory in the App, are being displayed. “(from App)” indicates you are looking at values the App already has in memory which are being displayed as the app waits for the node’s values to be retrieved – once received it will display “(from Node)”. Typically you want to be working with those retrieved from the node.
  • In WiFi management the “Save to node” mode now always defaults to “ALL”. To force the node to only use a single set of credentials, you must explicitly change the mode to “ACTIVE ONLY”
  • The list of available Time Zones now includes all the values provided in the ArchLinux operating system
  • A new “GPIO Control” screen has been added to the setup section of the “Node Details” screen. (Only available for ClearRPT devices.) This screen provides GPIO output state control for the 5 GPIO pins in the ClearRPT 15 pin connector. These pins can also be controlled from Timed Events.

ClearNode 1.36 for iOS and Android, API 96 released …

This brings the Apple iOS app up to date and implements NVMQ node<>app command messaging, which will automatically be set as the default. This is a minor release for Android, cleans up a couple of bugs and dials back the developer instrumentation.

API 96 clears up a couple of bugs and also now updates the wpa_supplicant WiFi control configuration file with the appropriate country code.

Season’s Greetings … Gerry.


ClearNode V1.36 for Android released …

This releases focuses on our migration away from AWS Messaging Services. By default, after you install the update for your Android device, your mobile app will start using “NVMQ” in favor of “AWS MQTT” for App to Node messaging.

This update requires that your nodes be at API Version 95 and RedNode Code Revision 1245 or better.

Also in the release is support for “Private Nodes” – an automated way of configuring your nodes that are on the same network so they connect to each other without complicated configuration in “rpt.conf”. You can find the option on the “Your Nodes” screen’s context menu.

We released the Android version first because the issues between Android and AWS MQTT were primarily what drove the migration – thus Android was the priority.

Apple iOS users – hang in there – we’ll get caught up hopefully next week.

73 … Gerry.


API 95 released …

(Wait what happened to API 94 ? Three guesses …)

This is the beginning of our move to a new messaging structure. Historically we have used AWS’s IoT MQTT messaging service to propagate information between your ClearNodes and your Apple iOS and Android mobile applications. There seems to have been changes at AWS that have degraded service for our system.

We have implemented our messaging server using a system that is Open Source and very mature. Initially we will be running the two systems in parallel so we can validate the solution – with an eye to making a complete switch at some point in the near future. This should guarantee us that teething problems won’t affect the current production environment.

There will be updates for the ClearNode mobile apps coming later in the month – but for now we need to prove out the back end infrastructure. Until the mobile app release, you shouldn’t see any difference in your nodes or the mobile app.

73 … Gerry.